| ||||||
| ||||||
'Application/JAVA'에 해당되는 글 22건
- 2007.12.20 [JAVA] Tomcat 5 JNDI DataSource를 통한 DB 커넥션 풀 사용
- 2007.12.20 톰캣 5.5 설치 및 DataSource 설정 !!!
- 2007.12.18 [JAVA] User Define Exception
- 2007.12.18 자바언어로 배우는 디자인 패턴 입문 1장. Iterator 구현
- 2007.12.18 [JAVA] Stand-alone Persistence in a Java SE Project
- 2007.12.17 [JAVA] 기본!
- 2007.12.17 [JAVA] dbhelper
- 2007.12.17 [JAVA] java msql 연동 2번째
- 2007.12.17 DAO (Data Access Objects) 요약
- 2007.12.13 JAVA MSSQL2005 JDBC 드라이버
출처 : http://blog.naver.com/thinkers09?Redirect=Log&logNo=37787712
0. 설치 버젼
0.1 JDK : j2sdk1.4.2_09
0.2 TOMCAT : tomcat-5.5.23
0.3 ORACLE : oracle 9i
1. 톰캣 다운로드 및 설치
1.1 톰캣을 다운로드한다. ( http://tomcat.apache.org/download-55.cgi )
1.2 Core를 다운로드 했을 경우 jdk1.4 버젼에서 구동되지 않으니
jdk1.4버젼용을 다시 다운받고(아래 있음..ㅋㅋ) Core 압축푼곳에 덮어쓴다.
2. DataSource 설정
2.1 <CATALINA_HOME>/common/lib 디렉토리에 ojdbc14.jar 파일을 복사한다.(ojdbc14.zip 아님..ㅠㅠ)
2.2 server.xml 파일 설정
-----------------------------------------------------------------------------------------------
<!-- Global JNDI resources -->
<GlobalNamingResources>
.
<Resource name="ORCL"
auth="Container"
type="oracle.jdbc.pool.OracleDataSource"
driverClassName="oracle.jdbc.driver.OracleDriver"
factory="oracle.jdbc.pool.OracleDataSourceFactory"
url="jdbc:oracle:thin:@127.0.0.1:1521:ORCL"
maxActive="20"
maxIdle="10"
maxWait="-1"
user="kbs"
password="0000"
/>
</GlobalNamingResources>
-----------------------------------------------------------------------------------------------
2.3 context.xml 설정
-----------------------------------------------------------------------------------------------
<Context>
.
<ResourceLink global="ORCL" name="ORCL" type="oracle.jdbc.pool.OracleDataSource"/>
</Context>
-----------------------------------------------------------------------------------------------
2.4 web.xml 설정
-----------------------------------------------------------------------------------------------
<resource-ref>
<description>Oracle Datasource example</description>
<res-ref-name>ORCL</res-ref-name>
<res-type>javax.sql.DataSource</res-type>
<res-auth>Container</res-auth>
</resource-ref>
-----------------------------------------------------------------------------------------------
2.5 톰캣 시작~~~!!!!
3. ERROR 메세지
3.1 Cannot create JDBC driver of class '' for connect URL 'null'
3.1.1 ojdbc14.jar 파일이 혹 zip파일이 아닌지 확인하고, 복사한 위치가
<CONTEXT>/WEB-INF/lib인지 확인한다. 요기 들어가 있음 위의 메세지를 볼수두 있당.
확인해보고 <CATALINA_HOME>\common\lib 에만...!!! 복사한다.
3.2 java.sql.SQLException: 호출에 부적합한 인수입니다
3.2.1 server.xml에 정의한 <Resource>에 빠진게 있는지 확인한다.. 주로 user, password를 빼먹으니
url 및 user 등을 확인해본다.
4. 의문점
4.1 왜 추가한 context에 정의하면 안되는지 모르겠당. 블로그들 보면 \tomcat\conf\catalina\localhost\에
<context>.xml 파일을 추가하고 resource를 넣어주면 되던데.. 이러면 꼭 <CATALINA_HOME>\common\lib 에
ojdbc14.jar파일을 넣지 않아도 될것 같은데 말이다.. 휴.. 이틀 해매다.. 구냥 이렇게 설정하는데 혹 아시는분 계신다면
알려주심 감사하겠습니다.^^
------------------------------------------------------------------------------------------------------------
5.0과 5.5의 설정 방법이 다르다..
server.xml에 있는 내용을 제거하고 \tomcat\conf\catalina\localhost\<context>.xml 파일에 아래와 같이 추가해준다.
<Resource name="ORCL" auth="Container" type="javax.sql.DataSource"
maxActive="5" maxIdle="2" maxWait="10000"
username="kbs" password="0000" driverClassName="oracle.jdbc.driver.OracleDriver"
url="jdbc:oracle:thin:@127.0.0.1:1521:ORCL"/>
출처 :http://cafe.naver.com/javasolution/58
* Exception은 2가지 종류가 있다.
시스템 정의 Exception ( System Define Exception ) 과 사용자정의 Exception ( User Define Exception).
1. 다음과 같은 이름으로 사용자정의 Exception를 작성하시오. ( UserDefineException.java )
2. 다음 코드를 실행시키면 에러가 발생한다. UserDefineException으로 예외처리하시오.
public class ExceptionTest {
public static void main ( String [ ] args){
a();
}//
public static void a(){
b();
}//
public static void b(){
String name;
Systme.out.println( name.charAt( 0 ) );
}//
}//
1번정답:
public class UserDefineException extends Exception {
public UserDefineException( String mesg){
super( mesg );
}
}
사용자정의클래스를 만들때에는 구현내용은 정해진것이 없지만 반드시 Exception클래스를
상속받아야 한다. 일반적으로 문자열을 처리할수 있는 생성자를 만드는것이 보통이다.
또한 필요에 의해서 인스턴스변수 및 메소드도 추가할 수 있다.
2번정답:
public class ExceptionTest {
public static void main ( String [] args ){
try{
a();
}catch( UserDefineException u ){
System.out.println( u.getMessage() );
}
}//
public static void a() throws UserDefineException{
b();
}//
public static void b() throws UserDefineException{
try{
String name = null;
System.out.println( name.charAt(0) );
} catch( NullPointerException e){ // 실제로 catch한것은 NullPointerException 이지만 사용자정의클래스를 생성하여 처리.
throw new UserDefineException( "널포인터 발생");
}
}//
}//
어느 메소드에서나 예외처리를 할 수 있지만 main에서 처리하게 구현함.
이와 같은 예외처리 방법을 반드시 숙지할것
링크관리도 구현했으니 이제 디자인 패턴을 구현해본다.
디자인 패턴의 구현은 자동화 도구를 통한 소스생성과 컬레보레이션을 구현한 클래스라이브러리의 결합에 의해 가능하다. 여기에서는 어느 부분을 자동화 도구로 지원해야 하고, 어떤 부분이 구현된 라이브러리가 될 수 있는지를 구분해서 설명하도록 한다.
구현언어는 C#이다.
기본적인 내용은 책을 참조하고, 여기에서는 어떻게 자동화 도구로 디자인 패턴 구현을 자동화 할 것인지, 어떻게 컬레보레이션을 구현하는지에 집중하도록 하자.
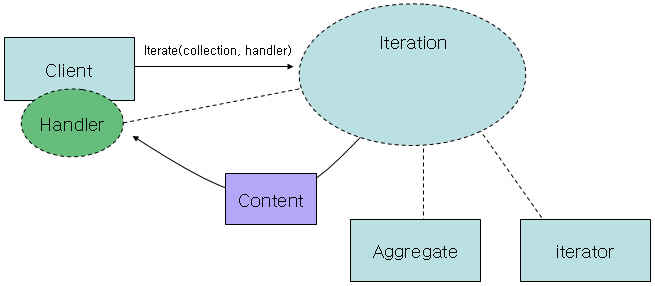
1장. Iterator 패턴
컬렉션의 요소를 하나씩 열거하면서 처리한다.
컬렉션에서 요소를 얻는 방법
- 키를 통해(예: Hashtable)
- 컬렉션 내의 위치 정보를 통해(예: List)
- 처음부터 끝까지 하나씩 열거를 통해(Iterator)
Iterator는 컬렉션 내의 요소를 처음부터 차례로 스캔한다.
스캔 방법은 다음 요소가 있는지 확인 해 보고, 있으면 다음 요소를 얻는다.
Aggregate는 Iterator를 통해 요소를 얻는 방법을 제공하는 컬렉션이다. 즉, Iterator를 지원하는 컬렉션이 Aggregate이다.
Client에서는 Aggregate 컬렉션에게 Iterator를 요청하고, 이것을 사용해서 Aggregate가 포함하는 요소를 하나씩 열거할 수 있게 된다.

{
public event Iterate IterateHandler = null;
public void Iterate(ICollection collection, Iterate handler)
{
foreach (object element in collection)
{
handler(element);
}
}
{
foreach (object element in collection)
{
if (IterateHandler != null) IterateHandler(element);
}
}
{
Stack reverseCollection = new Stack();
foreach (object element in collection)
{
reverseCollection.Push(element);
}
{
handler(element);
}
}
{
Stack reverseCollection = new Stack();
foreach (object element in collection)
{
reverseCollection.Push(element);
}
{
if (IterateHandler != null) IterateHandler(element);
}
}
{
IterateHandler = null;
}
}
{
private string _name = string.Empty;
public Book(string name)
{
_name = name;
}
public string Name
{
get
{
return _name;
}
}
}
{
static void Main(string[] args)
{
ArrayList bookShelf = new ArrayList();
bookShelf.Add(new Book("Around the World in 80 Days"));
bookShelf.Add(new Book("Bible"));
bookShelf.Add(new Book("Cinderella"));
bookShelf.Add(new Book("Daddy-Long-Legs"));
iteration.Iterate(bookShelf,new Iterate(WriteBookName));
System.Console.Read();
{
System.Console.WriteLine(((Book)book).Name);
}
}
{
private string _name = string.Empty;
private string _isbn = string.Empty;
public Book(string name, string isbn)
{
_name = name;
_isbn = isbn;
}
public string Name
{
get
{
return _name;
}
}
public string ISBN
{
get
{
return _isbn;
}
}
}
{
static void Main(string[] args)
{
ArrayList bookShelf = new ArrayList();
bookShelf.Add(new Book("Around the World in 80 Days", "aaa"));
bookShelf.Add(new Book("Bible","bbb"));
bookShelf.Add(new Book("Cinderella", "ccc"));
bookShelf.Add(new Book("Daddy-Long-Legs", "ddd"));
iteration.IterateHandler +=new Iterate(WriteBookName);
iteration.IterateHandler += new Iterate(WriteBookISBN);
System.Console.Read();
{
System.Console.WriteLine(((Book)book).Name);
}
{
System.Console.WriteLine(((Book)book).ISBN);
}
}
Stand-alone Persistence in a Java SE Project
This document takes you through the basics of developing a Java application with stand-alone persistence using Java EE 5 technology. This document uses the NetBeans 5.5 release and the Sun Java System Application Server 9.0, Platform Edition.
Expected duration: 15 minutes
Software Needed for the Tutorial
Before you begin, you need to install the following software on your computer:
- NetBeans IDE 5.5 (download)
- Java Standard Development Kit (JDK) version 5.0 or version 6.0 (download)
- Sun Java System Application Server 9.0, Platform Edition (download)
Note: While this tutorial assumes that you will have the Sun Java System Application Server installed, you can alternatively follow along by downloading just the Persistence API and using a pre-configured database connection.
Notations Used in the Tutorial
- ${GLASSFISH_HOME}- The installation directory of Sun Java System Application Server 9.0. On Windows systems, this is usually C:\Sun\AppServer\
Tutorial Exercises
The following topics are covered below:
Setting Up the Java Application Project
The goal of this exercise is to download and open the example Java application project and configure the project's classpath to contain the libraries for Java EE 5 and the Java DB database client.
Opening the Example Project
- Download the example project and unzip it to a location on your computer.
- In Netbeans, choose File > Open Project (Ctrl-Shift-O), select the AddressBook directory, and click Open Project.
- Examine the project in the Projects window. The project contains a GUI front end for the program and a DBHelper.java class that populates the database with some sample data.
Configuring the Classpath
- Right-click the project's Libraries node and choose Add JAR/Folder.
- Add ${GLASSFISH_HOME}/lib/javaee.jar
- Add the driver to your database. If you are using the Java DB database bundled with the Sun Java System Application Server, add ${GLASSFISH_HOME}/javadb/lib/derbyclient.jar to the project's classpath.
Coding the Entity Classes
With Java EE 5 persistence, we use a persistence.xml file to define connection settings to the database. We then create entity classes that represent each of the tables in the database, and use getter and setter classes in the entity classes to work with the table data.
Creating a Persistence Unit
- Right-click the project and choose New > File/Folder.
- From the Persistence category, select Persistence Unit and click Next.
- Select the database connection to your application from the drop-down list. (If you are using the Java DB database, this will be: jdbc:derby://localhost:1527/sample[app on APP].) Then, for Table Generation Strategy, select Drop and Create to allow tables to be created at runtime. Leave the rest of the values at their defaults.

- Click Finish. The IDE creates persistence.xml and opens it in the Source Editor.
- In persistence.xml, switch to the XML View by clicking on the XML button in the upper left corner of the Source Editor (alternatively use Alt+Shift+Right or Alt+Shift+Left). Make sure that the appropriate password for your database connection is supplied. If you are using the JavaDB, the default password is app: <property name="toplink.jdbc.password" value="app"/>
Creating the Address Entity Class
We will now create the Address entity class. When you create the entity class, the IDE adds the @Entity annotation to define the class as an entity class. After we create the class, we will create fields in the class to represent the data that we want in our table.
- Right-click the project and choose New > File/Folder.
- From the Persistence category, select Entity Class and click Next.
- Type Address for the class name, addressbook for the package, and leave the primary key type as Long. Click Finish.
When you click Finish, the entity class Address.java opens in the Source Editor. In the Source Editor, do the following: - Add the following field declarations to the class: String street; String city; String country;
- Choose Refactor > Encapsulate Fields from the right-click menu in the Source Editor. This will allow you to switch the access mode for the fields to private, as well as generate getters and setters for each of the fields. Leave Fields' Visibility at private, and Accessors' Visibility at public. Make sure that getter and setter checkboxes are selected for all fields. Click Next.
- In the Refactoring tab of the Output window, click Do Refactoring. The IDE adds the getter and setter methods for the fields and changes the visibility of the fields to private.
- We now want to change the name of one of the columns that will be created in our database table: instead of id, we want our column to be called AddressID. To do this, we can use annotations to specify the name of the generated column by adding the following annotation to the id field declaration. Add the following line to the id field declaration in Address.java: @Column(name="AddressID")
- Press Alt-Shift-F to generate an import into the class for javax.persistence.Column.
Your field declaration should now look like this:
Creating the Person Entity Class
We will now create the entity class Person representing the PERSON table in our database.
- Right-click the project and choose New > Entity Class.
- Type Person for the class name, addressbook for the package, and leave the primary key type as Long. Click Finish.
- Create the following field declarations: String surname; String name; Address address;
- Choose Refactor > Encapsulate fields to switch the access mode for the fields to private and generate getter and setter for the fields. Again, leave Fields' Visibility at private and Accessors' Visibility at public. Make sure that getter and setter checkboxes are selected for all fields. Click Next.
- In the Refactoring tab of the Output window, click Do Refactoring. The IDE adds the getter and setter methods for the fields and changes the visibility of the fields to private.
- Add the following annotation (in bold) above the id field declaration: @Id @GeneratedValue(strategy = GenerationType.AUTO) @Column(name="PersonID") private Long id;
- Add the following annotation (in bold) above the address field declaration. If you place the cursor in the field declaration you can use the source editor hints to generate the annotation for you: @OneToOne(cascade=CascadeType.ALL) private Address address;
- Change the body of the toString method as follows: public String toString() { return surname + ", " + name + ": " + address.getStreet() + ", " + address.getCity() + ", " + address.getCountry(); }
- Press Alt-Shift-F to generate any missing import statements.
Editing the DBHelper Class
The DBHelper class is used by the program to interact between the database and the front-end user interface. The class already has a createPersons method that provides data for the database. We need to create methods that enable us to populate the database, insert a new person, and get all entries.
- Double-click DBHelper to open it in the Source Editor.
- Right-click in the Source Editor and choose Persistence > Use Entity Manager.
The IDE adds the following field to the class: private static EntityManagerFactory emf = Persistence.createEntityManagerFactory("AddressBookPU");and adds the following persist method:
public void persist(Object object) { javax.persistence.EntityManager em = emf.createEntityManager(); em.getTransaction().begin(); try { // TODO: // em.persist(object); em.getTransaction().commit(); } catch (Exception e) { e.printStackTrace(); em.getTransaction().rollback(); } finally { em.close(); } }The following import statement is also added to the class:
import javax.persistence.Persistence; - We need to change the name of the persist method created by the Entity Manager so that it corresponds to the add method used elsewhere in our project. Make the following changes (in bold) to the persist method that was just created: public static void add(Object object) { javax.persistence.EntityManager em = emf.createEntityManager(); em.getTransaction().begin(); try { em.merge(object); em.getTransaction().commit(); } catch (Exception e) { e.printStackTrace(); em.getTransaction().rollback(); } finally { em.close(); } }
- Now, add the following methods to the class: public static void setUpDB() { for (Person p: createPersons()) { add(p); } } public static List getData() { return emf.createEntityManager().createQuery("SELECT p FROM Person p").getResultList(); } private static EntityManagerFactory emF = Persistence.createEntityManagerFactory("persistence"); private static EntityManager em = emF.createEntityManager();
- Create the following methods in the class: public static void setUpDB() { EntityTransaction et = em.getTransaction(); et.begin(); for (Person p: createPersons()) { em.persist(p); } et.commit(); } public static void add(Object o) { EntityTransaction et = em.getTransaction(); et.begin(); em.persist(o); et.commit(); } -->
Summary
In this exercise, you created a persistence unit and added several entity classes enabling the database to interact with the front-end user interface. You then configured the persistence unit to create tables at deploy time.
Running the Project
Now let's start the database server, build the project, and run the GUI interface.
- Start your database server. If you are using the Java DB database, choose Tools > Java DB Database > Start Java DB Server.
- Right-click the project node and choose Run Project. The following form displays all of the data in the table:

- Choose Menu > Add Person to add a person to the database. Fill in some sample data, as shown below, then click Add.
The data is added to your database, and you will notice the changes are updated immediately in the Address Book window.
Summary
In this exercise, you set the necessary runtime options and tested the program by displaying the data in the table and adding a new entry.
Next Steps
To send comments and suggestions or get support, please use the feedback link above. To keep informed on the latest developments on the NetBeans IDE J2EE development features, join the nbusers@netbeans.org mailing list.
자바라는 언어는 다른 프로그래밍 언어와 마찬가지로 컴퓨터와 대화할수 있는 수단이다.
c 는 언어이고 자바는 인터프리터 언어이다.
자바의 특징
1. 이식성이 높은 언어
한번 코딩되어 컴파일된 상태의 클래스 파일은 다시 수정하지 않고도 JVM이 설치되어 있는 시스템에서는 실행가능하다.
JVM(Java Virtual Machine) 자바 가상머신 ; 인터프리터의 기능을 수행하는 프로그램.
2. 외부 포인터를 제거하고 내부적인 포인터 사용
c,c++의 겉으로 드러나는 포인터를 제거하고 내부적으로 객체의 메모리 할당시에 무조건 동적으로 메모리를 할당시키는 방식을 취함.
3. 완벽한 객체지향적 언어
플랫폼에 독립적 (분리로봇으로 개념정립) ; 분리되어도 작동하는데 이상없다.
J2SE JDK (Java2 Standard Edtion Java Developement kets) : 자바 개발툴로 compiler를 포함하고 있다.
자바프로그램을 위한 필수 요소
1. Source를 만들수 있는 텍스트 에디터 (텍스트로 작성이 가능한 모든 에디터 프로그램 가능)
ex. 메모장, editplus, Eclipse, Ultra Edit 등등
2. 자바 개발툴 즉 컴파일러 : JVM이 포함되어 있다.
※ 자바의 모토 : Write Once, Run Anywhere. 운영체제와 상관없이 자바 프로그램이 실행된다.
단, 운영체제내에 JVM이 설치되어 있어야 작동 가능하다는 전제조건 존재.
자바 프로그램을 작성하기 위해서 우선 Sun사에서 JDK 1.4 버젼을 다운로드 받아 설치한다.
원활하고 효율적인 사용 위해 환경 변수를 설정한다.
※ 환경변수 설정
시작 - 설정 - 제어판 - 시스템 - 고급 - 환경 변수 클릭
시스템 변수 아래 편집 클릭
변수이름 : path
변수값으로 자바 컴파일이 있는 경로를 써넣는다.
환경변수를 설정하는 이유는 앞에서 설명한바와 같이 효율적인 사용을 위한것이다.
Path를 꼭 설정하지 않고 사용해도 컴파일과 실행에는 지장이 없다. (단, 컴파일러가 위치한 곳에서만 컴파일러 및 실행 가능)
자바 Version
Java 1.1
Java 1.2 ~ 1.4 : Java2라고 명명
Java 1.5 : Java5라고 명명
Java 1.6 : Java6라고 명명
☞ 버젼에 대한 세부소개
Java 1. 4. 2_6
4라는 숫자는 획기적인 변화가 있을때 증가한다. 1.2와 1.4는 전혀 다르다.
2는 업그레이드를 뜻하고, _ 다음에 있는 6이라는 숫자는 미세한 업그레이드가 있을시에 추가된다.
텍스트 파일은 컴퓨터가 있을수 없다. 반드시 0과 1의 이진코드인 기계어로 컴파일을 해야 실행 가능하다.
jdk의 bin 폴더에 javac라는 컴파일러를 통해 텍스트로 작성된 .java 파일이 컴파일된다.
컴파일이 되면 0과 1의 조합인 클래스파일 .class 이 생성된다.
JVM인 java로 자바 파일을 실행하면 프로그램이 실행된다.
Java Coding시 유의사항
1. 클래스명과 파일명이 같아야 한다.
2. Java에서는 대, 소문자를 엄격히 구분한다.
3. 한문장 끝에는 반드시 ;(세미콜론)을 붙인다.
4. () {} 을 주의해야 한다.
Java 프로그램의 기본 형식
class 클래스명 {
public static void main(String[] args) {
System.out.println("First Java Program");
}
}
▶ System.out.println(); 은 " " 안에 있는 문자를 화면에 출력하라는 뜻.
Java 의 핵심기술
Java SE (Java Standard Edition) : 기본
Java EE(Java Enterprise Edition) : 기업형으로 대형 프로젝트
Java ME (Java Micro Edition) : 주로 휴대폰, 작은 시스템
jdk 폴더내에 jre, lib => 참조 
접근 지정자
private : 클래스 내부에서만 사용 가능, 다른 클래스에서는 이 멤버 사용 불가능
public : 모든 클래스가 접근 가능
default (friendly, package) : 같은 패키지 안의 클래스가 접근 가능
protected : 같은 패키지 안의 클래스가 접근할수 있고, 다른 패키지에 있는 자식 클래스도 접근가능(상속 관계에 있는 클래스)
클래스 앞에 올수 있는 접근 지정자
public
default(friendly)
은닉화(또는 캡슐화) : 다른 클래스에서 멤버변수에 직접적으로 접근하는것을 막는것.
객체는 자신의 데이터와 내부에서 일어나는 일은 외부로부터 숨기고, 단지 외부에는 객체 내부와 통신할수 있는 인터페이스 제공
외부에서는 객체의 인터페이스만을 통해 그 객체를 사용할수 있게 하는것.
오버로드(Overload)
같은 이름을 가지는 멤버 메소드를 정의하는것
생성자 : 객체를 만드는 순간에 호출되어 실행되는 특수한 메소드
ex) Ex e = new Ex();
멤버 변수를 초기화 하지 않으면 기본자료형은 0을, 레퍼런스는 null을 기억하게 된다.
생성자의 이름은 클래스의 이름과 동일하고 리턴형이 없다.
컴파일러가 만들어주는 생성자를 default 생성자라고 함.
디폴트 생성자는 매개변수가 없고 몸체가 비어 있다.
class Ex {
Ex() { }
}
this()
생성자에서 오버라이드된 다른 생성자 호출 가능.
생성자 호출 : this(), this(a), this(a,b)
this() 호출의 제한
생성자의 실행은 다른 처리보다 우선적이므로 this()는 {}안에서 맨위에 있어야 한다.
생성자는 객첼를 생성하기 위해서만 사용되기 때문에 일반메소드는 객체를 생성한후에 사용하는 메소드이므로 this() 를 일반 메소드에서 호출 할수 없다.
객체의 생성과 소멸
객체가 필요에 의해 생성되었다면 반대로 언젠가는 소멸하게 된다.
소멸이라는 말은 메모리에서 제거된다는 뜻.
객체의 생성과 소멸 시기를 정확히 알아야만 객체를 잘 활용 가능.
static
데이터 값의 공유를 위해 선언하는 공간 (멤버 필드로만 가능)
클래스 이름으로 접근 가능
객체 발생 전 메모리 할당
static 초기화 영역
static 멤버 필드의 값을 초기화 하기 위한 영역
예) static { 초기화 구문 }
static 메소드 : static 필드 컨트롤 목적
class Ex_1 {
private String name;
private double don;
private static float iyul;
static {
iyul = 0.04f;
}
public Ex_1 (String name, double, float iyul) {
this.name = name;
this.don = don;
Ex_1.iyul = iyul;
}
public void disp() {
System.out.println("name" + name);
System.out.println("don" + don);
System.out.println("iyul"+ iyul);
}
}
public class Ex {
public static void main(String[] args) {
Ex_1 ex1 = new Ex_1();
ex1.disp();
System.out.println();
Ex_1 ex2 = new Ex_1();
ex1.disp();
ex2.disp();
}
}
static 프로그램 시작시에 실행된다.
함수 선언
데이터형이 필요
함수의 데이터형 = 반환값
받으면 준다.
ex1=fun(ex1); // 함수(function) 호출 Call by function
ex2=fun(ex2);
ex3=fun(ex3);
// fun(인자);
int[] func(int[] ex) {
내용부;
return ex;
}
예제
int money=2000;
int month=13;
int result1=(money/month)-((money/month)*0.15);
money=3000;
int result2=(money/month)-((money/month)*0.15);
money=4000;
int result3=(money/month)-((money/month)*0.15);
money=5000;
int result4=(money/month)-((money/month)*0.15);
int result6 = fun(6000);
int result7 = fun(7000);
int result8 = fun(8000);
int result9 = fun(9000);
int fun(int money) {
int month=13;
int result5=(money/month)-((money/month)*0.12);
return result;
}
main() 프로그램 시작시 호출 - 고정
예제2
int a=4;
int b=5;
int c= plus(a, b);
a=plus(3, 3);
//float d = plus(3,3); 불가
//btye d =plus(3,2); 불가
int plus(int a, int b) {
return a+b;
}
호출한 데이터형 그대로 받는다.
반환형 : 함수가 만들어내는 결과치가 가르키는 데이터형
함수명 : 변경 가능
반환형 함수명(인자) { // 인자는 개수에 상관없다. 반환형은 한개다.
선언부;
}
int a(){ }
public static void main(String[] args) { } // main() method(함수) 프로그램 시작시 제일 먼저 호출
void : 반환값이 없다. return 하지 않는다.
함수에 따라 값이 없는 경우가 있다.
사용자 정의 함수 : 임의로 만들어진 함수
class 이름 { }
int ys=10;
int yb=2;
int cb=2;
int cs=0;
변수들을 묶어놓는다.
구조체 : 관련있는것끼리 묶어 놓은것 (class)
영희 {
int s=10;
int b=10;
}
철수 {
int s=0;
int s=2;
}
영희.s // . 참조
철수.s
class YoungHee {
int apple=10;
int peak=2;
}
class ChulSu {
int apple=0;
int peak=2;
}
YongHee yong = new YongHee();
ChulSu chul = new ChulSu();
yong.apple= yong-2;
chul.apple= chul+2;
레퍼런스변수 : 클래스를 가지는 변수
구조체 데이터형의 제약이 없다.
class Man{
int sa=0;
}
Man y= new Man();
y.sa=2;
객체에 대한 정의 : 클래스 (함수도 가질수 잇다.)
객체(Object or instance) 정의에 의해서 만들어진것.
class test {
public static void main(String[] args) {
Round09_01 R1 = new Round09_01(); // 객체 생성
R1.sub[0]=100, R1.sub[1]=20;
R1.sub[2]=10, R1.sub[3]=40;
R1.calc();
System.out.print(R1.avg);
}
}
String은 클래스이다.(Wrapper 클래스)
문자열
wrapper 클래스 : 자료형을 효율적으로 관리함과 동시에 완벽한 은닉화를 추구하기 위해 만들어진 자료형
대체 클래스
int Integer
float Float
char String
명명 규칙
변수명의 첫글자 소문자
첫글자 대문자 클래스명
String s = new String( {'1','2','4} );
String s = "123"
s.substring(0,2);
String a = "123";
a.length();
String s1 = "123";
String s2 = "123";
boolean a=s1==s2;
s1.equals(s2); // String 클래스 비교
레퍼런스 변수는 주소만 가진다.
String s ="abc"; // " " String 나타내는 상수
s= new String(1); = "1"
"123" + "456" => 문자열 합침 = "123456"
int a=32;
String s="56";
s=s+a; // 문자열 하나라도 있으면 String 56
s=32+a; // 에러
s=s+a+2+a; // "5666"
int val=125;
Integer ival = new Integer(val);
s= ival.toString();
System.out.println();
. : 참조
System class
out class
println() method
print() method
System.in.println();
int a = System.in.read();
System.out.println(a);
s=" " + val; // "125"
오라클 8.1.7 버젼을 사용하고 있습니다.
보시다시피 DataSource 를 통해 커넥션을 처리하고 있습니다.
1. 첫번째 클래스
아래 주요 사항중에 DataSource , Connection
객체가 멤버변수로 선언이 되어 있다는점
그리고 getConnection() ,freeConnection() 메소드가
동기화처리를 안하고 있다는 점입니다.
다음 클래스가 어떻게 수정되야 좋을지 조언 부탁드립니다.
public class OracleAdminConnectionManager{
static final String ORACLE_DATASOURCE = "java:comp/env/jdbc/OracleAdmin";
private DataSource ds = null;
Connection conn = null;
public OracleAdminConnectionManager(){
Context ctx = null;
try{
ctx = new InitialContext();
if(ctx == null)
ds = (DataSource)ctx.lookup(ORACLE_DATASOURCE);
}catch(NamingException nx){
nx.printStackTrace();
}
}
public Connection getConnection(){
try{
conn = ds.getConnection();
}catch(Exception ex){
ex.printStackTrace();
}
return conn;
}
public void freeConnection(Connection conn){
try{
conn.close();
}catch(SQLException sx){
}
}
public void finalize(){
try {
freeConnection(conn);
} catch (Exception ex) {}
}
}
2. 두번째 클래스
아래 클래스도 OracleAdminConnectionManager 를 멤버변수로 선언하고 있습니다.
package xxxxx.db.pool;
import java.sql.*;
import xxxxx.db.*;
import java.io.Reader;
import javax.servlet.http.*;
import xxxxx.util.LogDBAccess;
public class DBAdminAccess implements HttpSessionBindingListener{
// DB Connection
Connection con=null;
Statement stmt=null;
PreparedStatement pstmt =null;
ResultSet result = null;
OracleAdminConnectionManager mgr = null;
boolean conInUse = false;
int pageSize=20;
boolean hasPrev=false, hasNext=false;
ResultSubset subset=null;
String test = null;
public DBAdminAccess() {
}
public boolean setConnection(OracleAdminConnectionManager mgr) {
this.mgr = mgr;
this.con = mgr.getConnection();
if (con == null) {
conInUse=false;
LogDBAccess.err("Connection is null");
} else
conInUse = true;
return conInUse;
}
public boolean setDConnection() {
this.mgr = new OracleAdminConnectionManager();
this.con = mgr.getConnection();
if (con == null) {
conInUse=false;
LogDBAccess.err("Connection is null");
} else
conInUse = true;
return conInUse;
}
public boolean execute(String sql)
{
if (conInUse == false) return false;
try {
if (result != null) { result.close(); result=null; }
if (stmt != null) stmt.close();
stmt = con.createStatement();
return (stmt.execute(sql));
} catch (SQLException E) {
LogDBAccess.err(E,sql);
close();
return false;
} catch (Exception E) {
LogDBAccess.err(E,sql);
close();
return false;
}
}
public int executeUpdate(String sql)
{
if (conInUse == false) return 0;
try {
if (result != null) { result.close(); result=null; }
if (stmt != null) stmt.close();
stmt = con.createStatement();
return (stmt.executeUpdate(sql));
} catch (SQLException E) {
LogDBAccess.err(E,sql);
close();
return 0;
} catch (Exception E) {
LogDBAccess.err(E,sql);
close();
return 0;
}
}
public boolean execute(PreparedStatement statement) {
try {
stmt = statement;
if (result != null) { result.close(); result=null; }
return (statement.execute());
} catch (SQLException E) {
LogDBAccess.err(E," from prepareStatement execute");
close();
return false;
} catch (Exception E) {
LogDBAccess.err(E," from prepareStatement execute");
close();
return false;
}
}
/*------------------------------------------------------------
Description : Run Prepared/Callable Statement
Parameter :
nType :
0:PreparedStatement, 1:CallableStatement
Return Value
쿼리실행이 성공하면 true, 실패하면 flase
-------------------------------------------------------------*/
public boolean execute(int nType)
{
if (conInUse == false) return false;
try {
if (result != null) {
result.close();
result=null;
}
return (pstmt.execute());
} catch (SQLException E) {
LogDBAccess.err(E);
close();
return false;
} catch (Exception E) {
LogDBAccess.err(E);
close();
return false;
}
}
public PreparedStatement GetPrePareStatement()
{
return pstmt;
}
/*------------------------------------------------------------
Description : Create PreparedStatement
Parameter
None
Return Value
None
-------------------------------------------------------------*/
public PreparedStatement prepare(String sql) {
if (conInUse == false) return null;
try {
if (result != null) result.close();
pstmt = con.prepareStatement(sql);
return pstmt;
} catch (SQLException E) {
LogDBAccess.err(E,sql);
System.out.println("Esql=" + E);
close();
return null;
} catch (Exception E) {
LogDBAccess.err(E,sql);
System.out.println("Esql=" + E);
close();
return null;
}
}
/*------------------------------------------------------------
Description : Create PreparedStatement
Parameter
String : 쿼리문
resultSetType : a result set type; see ResultSet.TYPE_XXX
TYPE_FORWARD_ONLY : 커서가 앞으로만 이동할수 있다.
TYPE_SCROLL_INSENSITIVE : Scrollable, not sensitive
TYPE_SCROLL_SENSITIVE : Scrollable, sensitive
resultSetConcurrency : a concurrency type; see ResultSet.CONCUR_XXX
CONCUR_READ_ONLY : Not Updatable
CONCUR_UPDATABLE : Updatable
Return Value
None
-------------------------------------------------------------*/
public PreparedStatement prepare(String sql, int resultSetType, int resultSetConcurrency)
{
if (conInUse == false) return null;
try {
if (result != null) result.close();
pstmt = con.prepareStatement(sql, resultSetType, resultSetConcurrency);
return pstmt;
} catch (SQLException E) {
LogDBAccess.err(E,sql);
System.out.println("Esql=" + E);
close();
return null;
} catch (Exception E) {
LogDBAccess.err(E,sql);
System.out.println("Esql=" + E);
close();
return null;
}
}
/*------------------------------------------------------------
Description : PreparedStatement 인수값 설정
Parameter
None
Return Value
None
-------------------------------------------------------------*/
public void SetPrepareParameter(int nIndex, String strValue)
{
try {
pstmt.setString(nIndex, strValue);
//System.out.println("SetPrepareParameter(int, String)");
} catch (Exception E) {
LogDBAccess.err(E.toString());
close();
}
}
/*------------------------------------------------------------
Description :
Parameter
None
Return Value
None
-------------------------------------------------------------*/
public void SetPrepareParameter(int nIndex, int nValue)
{
try {
pstmt.setInt(nIndex, nValue);
//System.out.println("SetPrepareParameter(int, int)");
} catch (Exception E) {
LogDBAccess.err(E.toString());
close();
}
}
/*------------------------------------------------------------
Description :
Parameter
None
Return Value
None
-------------------------------------------------------------*/
public void SetPrepareParameter(int nIndex, float fValue)
{
try {
pstmt.setFloat(nIndex, fValue);
//System.out.println("SetPrepareParameter(int, float)");
} catch (Exception E) {
LogDBAccess.err(E.toString());
close();
}
}
/*------------------------------------------------------------
Description :
Parameter
None
Return Value
None
-------------------------------------------------------------*/
public void SetPrepareParameter(int nIndex, Date dValue)
{
try {
pstmt.setDate(nIndex, dValue);
//System.out.println("SetPrepareParameter(int, Date)");
} catch (Exception E) {
LogDBAccess.err(E.toString());
close();
}
}
/*------------------------------------------------------------
Description :
Parameter
None
Return Value
None
-------------------------------------------------------------*/
public void SetPrepareParameter(int parameterIndex, Reader reader, int nLength)
{
try {
pstmt.setCharacterStream(parameterIndex, reader, nLength);
} catch (SQLException e) {
System.out.println("JDBCConnection::SetPrepareParameter(int, Date) \n" + e.toString());
close();
}
}
/*------------------------------------------------------------
Description : ResultSet 객체 리턴
Parameter
None
Return Value
None
-------------------------------------------------------------*/
public ResultSet getResultSet(int nType) {
try {
result = pstmt.getResultSet();
return result;
} catch (SQLException E) {
LogDBAccess.err(E," from getResultSet()");
System.out.println("Esql=" + E);
close();
return null;
} catch (Exception E) {
LogDBAccess.err(E," from getResultSet()");
System.out.println("Esql=" + E);
close();
return null;
}
}
/*------------------------------------------------------------
Description : ResultSet 객체 리턴
Parameter
None
Return Value
None
-------------------------------------------------------------*/
public ResultSet getResultSet() {
try {
result = stmt.getResultSet();
return result;
} catch (SQLException E) {
LogDBAccess.err(E," from getResultSet()");
System.out.println("Esql=" + E);
close();
return null;
} catch (Exception E) {
LogDBAccess.err(E," from getResultSet()");
System.out.println("Esql=" + E);
close();
return null;
}
}
/*------------------------------------------------------------
Description : Update Count Return
Parameter
None
Return Value
None
-------------------------------------------------------------*/
public int getUpdateCount() {
try {
return stmt.getUpdateCount();
} catch (SQLException E) {
LogDBAccess.err(E," from getResultSet()");
System.out.println("Esql=" + E);
close();
return 0;
} catch (Exception E) {
LogDBAccess.err(E," from getResultSet()");
System.out.println("Esql=" + E);
close();
return 0;
}
}
/*------------------------------------------------------------
Description : Update Count Return
Parameter
None
Return Value
None
-------------------------------------------------------------*/
public int getUpdateCount(int nMode) {
try {
return pstmt.getUpdateCount();
} catch (SQLException E) {
LogDBAccess.err(E," from getResultSet()");
System.out.println("Esql=" + E);
close();
return 0;
} catch (Exception E) {
LogDBAccess.err(E," from getResultSet()");
System.out.println("Esql=" + E);
close();
return 0;
}
}
public void setPageSize(int size) {
pageSize = size;
}
public boolean hasPrev() {
if (subset != null)
return subset.hasPrev();
else return false;
}
public boolean hasNext() {
if (subset != null)
return subset.hasNext();
else return false;
}
public int getTotalPage() {
if (subset != null)
return subset.getTotalPage();
else
return 0;
}
public int getTotalNum() {
if (subset != null)
return subset.getTotalNum();
else
return 0;
}
public ResultSubset getResultSubset(int page) {
try {
result = stmt.getResultSet();
subset = new ResultSubset();
subset.init(page, pageSize, result);
return subset;
} catch (SQLException E) {
LogDBAccess.err(E," from getResultSubset():SQLException");
close();
return subset;
} catch (Exception E) {
LogDBAccess.err(E," from getResultSubset():Exception");
close();
return null;
}
}
public ResultSetMetaData getMetaData() {
if (result == null) return null;
try {
return result.getMetaData();
} catch (SQLException E) {
LogDBAccess.err(E," from getMetaData()");
close();
return null;
} catch (Exception E) {
LogDBAccess.err(E," from getMetaData()");
close();
return null;
}
}
public void setAutoCommit(boolean value) {
try {
if (conInUse == true) con.setAutoCommit(value);
} catch (SQLException E) {
LogDBAccess.err(E," from setAutoCommit()");
close();
} catch (Exception E) {
LogDBAccess.err(E," from setAutoCommit()");
close();
} finally {
}
}
public void commit() {
try {
if (conInUse == true) con.commit();
} catch (SQLException E) {
close();
LogDBAccess.err(E," from commit()");
} catch (Exception E) {
close();
LogDBAccess.err(E," from commit()");
}
}
public void rollback() {
try {
if (conInUse == true) con.rollback();
} catch (SQLException E) {
LogDBAccess.err(E," from rollback()");
close();
} catch (Exception E) {
LogDBAccess.err(E," from rollback()");
close();
}
}
/*------------------------------------------------------------
Description : 모든 자원을 해제한다.
Parameter :
None
Return Value
None
-------------------------------------------------------------*/
public void close()
{
try {
if (result != null) { result.close(); result=null; }
if (stmt != null) { stmt.close(); stmt=null; }
if (pstmt != null) { pstmt.close(); pstmt=null; }
if (mgr != null && conInUse == true) {
// mgr = OracleConnectionManager의 인스턴스
//System.out.println("DBAdminAccess.close()");
mgr.freeConnection(con);
conInUse = false;
}
//if (con != null) { con.close(); con=null; }
} catch (SQLException E) {
LogDBAccess.err(E," from close()");
} catch (Exception E) {
LogDBAccess.err(E," from close()");
}
}
/*------------------------------------------------------------
Description : 모든 자원을 해제한다.(session 종료시 -- test용)
Parameter :
None
Return Value
None
-------------------------------------------------------------*/
public void close(String test)
{
this.test =test;
try {
if (result != null) { result.close(); result=null; }
if (stmt != null) { stmt.close(); stmt=null; }
if (pstmt != null) { pstmt.close(); pstmt=null; }
if (mgr != null && conInUse == true) {
// mgr = OracleConnectionManager의 인스턴스
//System.out.println("DBAccess.close()");
mgr.freeConnection(con);
System.out.println("DBAdminSessionAccess Connection close"+test);
conInUse = false;
}
//if (con != null) { con.close(); con=null; }
} catch (SQLException E) {
LogDBAccess.err(E," from close()");
} catch (Exception E) {
LogDBAccess.err(E," from close()");
}
}
/*------------------------------------------------------------
Description : session이 살때,죽을때 동작을 하는 메소드
Parameter :
None
Return Value
None
-------------------------------------------------------------*/
public void valueBound(HttpSessionBindingEvent event){
System.out.println("DBAdminSessionAccess binding into Session");
}
public void valueUnbound(HttpSessionBindingEvent event){
test ="valueUnbound()";
try{
close(test);
}catch(Exception e){
System.out.println("valueUnbound Exception: "+e);
}finally{
con = null;
System.out.println("DBAdminSessionAccess unbinding into Session Finally");
}
}
public void finalize() {
try {
close();
} catch (Exception ex) {}
}
}
3. 상기 두 클래스를 통해 jsp를 통해 처리되는 형태
<jsp:useBean id="DBMgr" class="xxxxx.db.pool.OracleAdminConnectionManager" />
<jsp:useBean id="access" scope="page" class="xxxxx.db.pool.DBAdminAccess" />
<%
access.setConnection(DBMgr);
String queryNum= "select * from xxx";
try {
access.execute(queryNum);
rs = access.getResultSet();
중략 --
String sql = "insert into (a, b ,c) xxx value(?,?,?)"
access.prepare(sql.toString());
access.SetPrepareParameter(1,a);
access.SetPrepareParameter(2,b);
access.SetPrepareParameter(3,c);
access.execute(1);
}catch (Exception e) {
}finally {
access.close();
}
%>
필요한 JDBC파일들은 올려놓았다.
//------------------------------------------------------------
// Name : ConnectionDB.java
// Desc : Mysql DB와 연결을 담당 하는 클래스
//------------------------------------------------------------
package edu1;
import java.sql.*;
import sun.misc.*;
public class ConnectionDB
{
private Connection conn = null;
private Statement stmt = null;
private ResultSet rs = null;
//MS-SQL JDBC드라이버 로드
static final String msjdbc_driver = "com.microsoft.jdbc.sqlserver.SQLServerDriver";
static final String msjdbc_url = "jdbc:microsoft:sqlserver://203.247.166.172;databasename=project";//DB이름
//MSSQL ID, PASSWORD
private static String msid = "admin"; //mssql ID
private static String mspassword = "abc12345"; //mssql password
String url = msjdbc_url; //MSSQLJDBC URL
//-------------------------------------------------------
// Name : ConnectionDB
// Desc : 생성자
//-------------------------------------------------------
public ConnectionDB()
{
}
//-------------------------------------------------------
// Name : getPublicKey
// Desc : 데이타베이스와 연결해서 공개키를 가져온다.
//-------------------------------------------------------
//통합사이트에서만 키를 가져오면 된다.
public void getDB() throws Exception
{
String sql="select *from lathe where id='1'";
//MS-SQL에 연결
Class.forName(msjdbc_driver).newInstance();
conn = DriverManager.getConnection(url,msid,mspassword);
stmt = conn.createStatement();
rs = stmt.executeQuery(sql);
while(rs.next()){
System.out.println(rs.getString(1));
}
disconnectDB(); //DB와 연결을 끊는다.
}
//-------------------------------------------------------
// Name : disconnectDB
// Desc : 데이타베이스와 연결을 끊는다.
//-------------------------------------------------------
public void disconnectDB() throws Exception
{
conn.close();
stmt.close();
rs.close();
}
//main
public static void main(String[] args)
{
ConnectionDB db = new ConnectionDB();
db.getDB();
}
}
a component which provides a common interface between the application and one or more data storage devices, such as a database or file. The term is most frequently applied to the Object design pattern.
DAO를 활용하면 물리적인 저장 장치가 파일에서 관계형 데이터페이스로 변화하더라도 애플리케이션이 영향을 덜 받도록 해준다. 물리적인 저장은 모두 관계형 데이터베이스를 활용하는 경우에도 제품의 종류나 데이터 접근 오퍼레이션(CRUD 작업)을 돕는 솔루션을 활용에 따라서 실제 구현은 많이 달라지게 된다. DAO와 같은 공통적인 접근 인터페이스를 두지 않는다면, RDBMS 제품이나 활용 솔루션에 변화가 생길 때마다 애플리케이션에도 변경이 필요하게 된다.
DAO는 Core J2EE 패턴으로 소개되었다.


* 설치환경 *
- Windows XP
- JAVA 1.3
JAVA가 설치 돼 있는 환경을 기본으로 한다.
1. 마이크로소프트사 홈페이지에 다운로드 센터에서 JDBC 드라이버를 다운받는다.
MSSQL 2000버젼은 현재 SP3 버젼까지 나와있다.
2. setup.exe 파일을 다운받는다.
요즘 귀차니즘병이 많아 첨부파일로 올려놓겠다.
3. 다운받은 setup.exe파일을 실행해서 설치한다.
설치 방법은 긍정적인 대답만 눌러주면서 넘어가면 된다.
4. 설치가 완료 되면 C:\Program Files\Microsoft SQL Server 2000 Driver for JDBC 폴더가 생긴다.
5. C:\Program Files\Microsoft SQL Server 2000 Driver for JDBC\lib 폴더에 들어가면 3가지 파일이 나오는데 모두 복사한다.
6. JAVA설치 폴더 아래 jre\lib\ext 폴더에 5. 에서 복사한 파일을 붙여넣는다.
ext폴더가 없을경우 새로 생성하면 된다.
여기까지 왔으면 JDBC를 사용하기 위한 준비는 끝났다.
다음 소스코드를 실행해서 정상적으로 아무 출력없이 종료 된다면 설치완료!
MSSQL이외에 Oracle과 같은 다른 DBMS를 연결하고 싶다면
각 사이트에서 드라이버를 받아 위와 비슷한 절차를 통해 설치하면 된다.
==================================================================================
import java.sql.*;
public class TestJDBC{
public static void main(String[] args){
Connection connect=null;
Statement st=null;
ResultSet rset=null;
try{
Class.forName("com.microsoft.jdbc.sqlserver.SQLServerDriver");
}catch(ClassNotFoundException ce){
System.out.println(ce);
}
try{
//"jdbc:microsoft:sqlserver://서버ip주소:1433;DatabaseName=db명","사용자명","비밀번호"
connect = DriverManager.getConnection("jdbc:microsoft:sqlserver://127.0.0.1:1433;DatabaseName=DBNAME","sa","password");
st = connect.createStatement();
rset= st.executeQuery("Select * from table1");
}catch(SQLException se){
System.out.println(se);
}finally{
try{
if(rset!=null)rset.close();
if(st!=null)st.close();
if(connect!=null)connect.close();
}catch(SQLException se){}
}
}
}


