vb oracle 연결

2008. 1. 14. 09:51
1.OracleClient를설치하고,연결할Oracle을에대한설정을한다.

2.DBconnectFunction(여기서XXX부분에OracleClient에서설정한값을입력한다.)
-DB연결이필요한부분에아래function을호출한다.

PrivateSubConnectDB()
SetadoOraCon=NewADODB.Connection

WithadoOraCon
.ConnectionString="Provider=MSDAORA.1;DataSource=XXX;UserID=XXX;Password=XXX;PersistSecurityInfo=True"
.ConnectionTimeout=60
.Open
EndWith
EndSub

3.모듈에다음function을입력한다.
OptionExplicit
PublicadoOraConAsADODB.Connection

'Procedure:GetRecordSet
'Description:인자로넘어오는쿼리를실행하고,결과값을RecordSet으로반환
'Parameter:szSql(쿼리)
'ReturnValue:Recordset
PublicFunctionGetRecordSet(ByValszSqlAsString)AsADODB.Recordset

DimadoRsAsADODB.Recordset

SetadoRs=NewADODB.Recordset

adoRs.OpenszSql,adoOraCon,adOpenKeyset,adLockBatchOptimistic

'Recordset반환
SetGetRecordSet=adoRs

SetadoRs=Nothing

EndFunction

'Procedure:ExecuteQuery
'Description:인자로넘어오는쿼리를실행하고성공여부를반환
'Parameter:szSql(쿼리)
'ReturnValue:True/False
PublicFunctionExecuteQuery(szSqlAsString)AsBoolean

OnErrorGoToErrHandler

adoOraCon.ExecuteszSql

ExecuteQuery=True

ExitFunction

ErrHandler:
IfErr.Number<>0Then
MsgBoxErr.Source&vbCrLf&Err.Description,vbExclamation,"쿼리수행오류"
ExecuteQuery=False
Err.Clear
EndIf
EndFunction

4.원하는쿼리를만들어모듈의function을실행한다.
-일반적으로값을가지고오는SelectQuery이면,GetRecordSet를실행하고,
-insert,delete와같은데이터조작쿼리인경우에는ExecuteQuery를실행한다.

예)SELECTQuery
DimstrSQLAsString
DimadoRsAsADODB.Recordset

'//IMPORTANT:조회쿼리생성
strSQL="SELECT*FROMTEST_TABORDERBYA_COL"

SetadoRs=GetRecordSet(strSQL)

WhileNotadoRs.EOF
'//IMPORTANT:가지고온결과를처리하는부분
adoRs.MoveNext
Wend

adoRs.Close
SetadoRs=Nothing

예)ExecuteQuery
DimstrSQLAsString
strSQL="INSERTINTOTEST_TAB(a_col,b_col,c_col,d_col)VALUES('"&strName&"','"&strKorean&"','"&strMath&"','"&strEnglish&"')"

IfExecuteQuery(strSQL)=FalseThen
Msgbox"실패"
Else
Msgbox"성공"
EndIf
<
Posted by 나비:D
:

일 대 다 관계의 테이블이 있습니다.

이것을 쿼리 해서 화면에 표현해 주려하는데요.

1.조인 쿼리후 레코드셋으로 받아 루프돌며 찍는 방법

2. 마스터 테이블을 쿼리후 루프돌며 디테일 테이블을 쿼리하는 방법

대략 이렇게 많이 쓰게됩니다. (뭐 2번째는 거의 안쓰겠죠. ^^)

그런데 이번 작업을 하다보니 왠지 쓸데없는 낭비가 많은것 같아

다른 방법으로 처리해 보았습니다.

아래와 같은 일 대 다 관계의 테이블을 준비합니다.

각각의 테이블에 데이터를 입력해 보죠.

< tb_books >

< tb_subscriber >

이제 조인을 걸어 데이터를 얻어보겠습니다.

물론 여기까지는 원하는 대로(?) 잘 나옵니다.

저것을 레코드셋으로 받아 처리하면 되겠지요.

하지만 자세히 보면 낭비되는 부분들이 있습니다.

마스터 데이터 들이 반복되는 점이죠.

해서~ 이렇게 반복되는 부분을 없앨 방법을 고민하다 찾은 것이 바로

XML을 이용하는 것이었습니다.

XML로 아래와 같이 데이터를 받는다면 반복되는 많은 양이 줄어들며,

XMLDOM을 이용하여 node tracking을 한다면 데이터 처리도 간편할 것이고,

데이터를 DOM에 담는 즉시 데이터 베이스와의 커넥션을 끊으면 될것이기에 이래 저래 이득이라 생각했습니다.

XML로 받는다면 아래와 같이 받아야 할것입니다.

이제XML로 데이터를 어떻게 받아내면 될까요??

for xml 이라는 구문으로 쿼리를 하면 바로 XML 데이터를 받아낼 수 있습니다. 빙고~

SELECTa.idx,a.bookname,a.price,b.name
FROM
tb_booksASaINNERJOIN
tb_subscriberASbONa.idx=b.book_idx
ORDERBYa.idx
forxmlauto
for xml 의 옵션으로는 raw 도 있지만 이것은 그냥 레코드형식으로만 출력되므로 패스합니다.

for xml auto, elements 옵션을 사용하게되면 모든 컬럼이 element로 바뀌게 됩니다.

사용하는데 문제는 없지만 보기가 좀 어렵군요. ^^

자... SQL에서는 이제 XML로 데이터를 넘겨줄 준비를 완료 하였습니다.

다음은 ASP 단에서 어떻게 처리해야할지 알아보겠습니다.

ASP단에는 일단 쿼리를 위한 ADODB.Command 객체와 결과를 담을 XMLDOM 객체를 준비하여 아래와 같이 코딩합니다.

SetxmlDom=Server.CreateObject("Microsoft.xmldom")
xmlDom.setProperty
"SelectionLanguage","XPath"

setcmd=server.createObject("ADODB.Command")
withcmd
.ActiveConnection
="Database 커넥션'
.CommandText
="여기에는 쿼리를"
.CommandType
=adCmdText

.Properties(
"XMLRoot")="root"
.Properties("OutputStream")=xmlDom
.Execute,,
1024
endwith
set
cmd=Nothing

이렇게 하면 XMLDOM에 결과가 root라는 root 엘리먼트를 가진 xml 데이터가 로드됩니다.

이제는 단순히 XMLDOM node tracking을 하면서 데이터를 뿌려주면 됩니다.

Setitems=xmlDom.selectNodes("*/a")

foreachiteminitems
WithResponse
.Write
""&item.getAttribute("bookname")&"
"
foreachsubscriberinitem.selectNodes("./b")
.Writesubscriber.getAttribute(
"name")&"
"
next
EndWith
next
<
Posted by 나비:D
:
이글은 한동훈님이 'Linux World' 라는 잡지에 97-98년에 걸쳐 8회에 걸친 연재물을 우연히 구하게 되어 여러분들께 제공되는 글로서 안타깝게도 원저자에게 연락을 해보지 못해 양해를 구하지 못한 글입니다. 그러나 많은 분들께 도움을 드릴수 있을 것으로 판단되어 허락없이 올리게 되어 지면을 통해 양해를 구하는 바입니다.
또한 이글은 PostgreSQL v 6.3.2가 나왔던 시절의 글이므로 현재와는 약간의 차이가 있습니다. 이점 고려하시면서 읽어 나가시기 바랍니다.


Posted by 나비:D
:
 

Oracle 구독자

Microsoft® SQL Server™ 2000에는 Intel 컴퓨터 상의 SQL Server 게시에 대한 Oracle 구독을 지원하는 ODBC 드라이버와 OLE DB 공급자가 포함되어 있습니다. SQL Server 2000 설치 프로그램은 드라이버를 자동으로 설치합니다.

참고   Oracle ODBC와 OLE DB 구독자에 복제하려면 Oracle 또는 소프트웨어 공급업체로부터 적절한 Oracle SQL*Net 드라이버를 구해야 합니다. 그런 다음, 이 드라이버를 게시자와 배포자에 설치해야 합니다.

Oracle 구독자에 대한 복제 제한 사항

Oracle ODBC 구독자에 복제할 때는 다음과 같은 제한 사항이 적용됩니다.

  • Oracle 구독자에는 이름에 공백이 있는 테이블의 복제가 만들어지지 않습니다. 복제는 실패하며 Oracle 오류 ORA-00903: 잘못된 테이블 이름이 발생합니다.

  • date 데이터 형식은 작은 datetime입니다(범위: 4712 B.C. - 4712 A.D.).

    Oracle에 복제하는 경우에는 복제된 열의 SQL Server datetime 항목이 이 범위 안에 있는지 확인합니다.

  • 복제된 테이블에는 long raw에 매핑되는 text 또는 image 데이터 형식의 열이 하나만 있어야 합니다.

  • datetime 데이터 형식은 char4에 매핑됩니다.

  • floatreal 데이터 형식에 대한 SQL Server 2000의 범위는 Oracle 범위와 다릅니다.

다음 표에서는 복제를 위한 데이터 형식을 Oracle 구독자에 매핑합니다.


PostgreSQL 강좌 1
-설치 및 기본 사용법

    한동훈/KLUG 회장

1. 들어가는말

    요즘은 한참 RDBMS가 유행이다. 눈만 뜨고 일어나면 데이터 베이스 솔루션이니 뭐니 하면서 마치 RDBMS를 모르면 이 세상을 살아 갈수 없는 것처럼 만든다. 적어도 그 대상을 프로그래머로 국한을 시키더라도 말이다.

    하지만 아직도 자그마한 중소기업에서는 클리퍼나 DB+ 같은 것을 사용하여 만든 데이터 베이스 프로그램을 사용하기도 한다. 무릇 어떠한 필요성이 어떠한 발명이나 발전을 있게 하는 것 같다. 요즘은 데이터 베이스 분야에도 관계형 개념을 넘어 객체지향 개념이나 분산개념이 도입되기도 한다. 가면 갈수록 세상은 빠르게 변하는 것 같고, 더욱 더 많은 능력을 프로그래머에게 요구하는 것 같다.

    우리가 일반적으로 알고 있는 RDBMS 중에는 오라클, 인포믹스 같은 수백만원을 호가하는 본격 상용 데이터 베이스 시스템이 많이 알려져 있다. 하지만 이에 못지 않은 데이터 베이스 시스템이 공개용으로 여러분 가까이에 있다고 하면 어떻게 할 것인가 ?

    리눅스 사용자라면 PostgreSQL이라는 강력한 RDBMS 있다는 것을 알고 있을 것이다.
    물론 PostgreSQL이외에도 쓸 만한 데이터 베이스 시스템으로 mSQL과 mySQL이라는 것도 있다.
    PostgreSQL는 정말 중간규모 정도의 기업에서 대용량 데이터 베이스를 처리하기에도 충분한 기능을 가지고 있다. 이제 PostgreSQL의 중요특징을 살펴보도록 하자 .

2.PostgreSQL 의 개요 및 특징

    PostgreSQL 의 공식 사이트인 'http://www.PostgreSQL.org" 의 대문짝에는 다음과 같은 글이 커다랗게 쓰여있다.

    " PostgreSQL는 강력한 차 세대 객체 - 관계형 DBMS로서 Berkeley Postgres 데이터베이스 관리 시스템에서 파생되었다. PostgreSQL는 강력한 객체-관계형 데이터 모델과 풍부한 데이터 타입, 쉬운 확장성을 가지고 있으며, PostQuel 질의 언어를 확장된 SQL의 부분 집합으로 대체하고 있다."

    PostgreSQL은 한마디로 객체지향 기능을 가지고 있는 관계형 데이터 베이스 시스템이다. PostgreSQL의 모태가 되는 최초의 Postgres 프로젝트는 1986년 마이클 스톤브레이커(Michale Stonebraker) 교수에 의해 주도되었으며. DRAPA(방위 진보 리서치 기관 ), ARO(육군 리서치연구소). NSF(미 국립 과학 재단) 등 여러 기관으로부터 후원을 받았다. 즉, 애초에 상업적인 목적으로 개발된 것이 아니라 교육 연구차원에서 개발된 것이였다. 나중에 설명하겠지만 이러한 특징은 PostgreSQL의 데이터 타입에서도 나타난다. 그리고 아이러니컬 하게도 PostgreSQL에 관련된 문서는 직접적으로 사용자 매뉴얼에 나타난 것보다도 각종 논문으로 발표된 것이 훨씬 많다.

    PostgreSQL는 매우 다양한 연구와 여러 응용 결과를 구현하는데 사용되어져 왔으며, 금융상의 데이터 분석 시스템, 제트엔진의 성능을 모니터링 하는 패키지, 소행성의 운동을 추적하는 데이터 베이스, 의학정보 데이터 베이스, 몇 개의 지리정보 시스템 등에 관련된 업무에 이용되어져 왔다.

    Postgres는 또한 여러 대학에서 교육용으로 쓰여져 왔다. 마침내 Illustra Information Technologies 에서는 일부의 코드를 사용하여 그것을 상업화하였다
    1992년에 Postgre는 '세퀴이어 2000과학 컴퓨팅 프로젝트'의 주요한 데이터 처리기로 선정되었다. 나아가서 1993년에는 내부 사용자 집단의 크기가 두배에 가까워졌다. 이것은 코드의 원형을 관리하고 그것을 지원하는 일에 데이터 베이스 연구 중 더 많은 시간이 할당되어 가고 있다는 점을 명백하게 말해준다. 이러한 힘든 수고를 줄이기 위해서 공식적으로 이 프로젝트는 버전4.2를 마지막으로 종료되었다.

    PostgreSQL는 이러한 Postgres의 마지막 릴리즈인 버전4.2에서 파생되었으며, 버클리 소재 캘리포니아 대학에서 개발되었다. PostgreSQL6.0 이전의 버전은 흔히 Postgre95라고 불러왔다.

    PostgreSQL의 코드는 현재 완전히 ANSI C로 작성되었으며, 코드의 크기도 약25%가 줄었고, 성능개선과 코드유지 부분에 대한 많은 내부적 변화가 있었다. PostgreSQL 버전은 이전의 Postgres에 비교해볼 때 상당한 속도상의 이점이 있다고 한다.

    PostgreSQL의 세가지 중요특징은 다음과 같다.

      관계형 모델 : Postgres 프로젝트 리서치의 최초의 목적 중의 하나는 복합객체(complex object), 규칙(rule) 등을 다룰 수 있으며, 고수준으로 확장가능한 관계형 DBMS를 제작하려던 것이었다. 따라서 PostgreSQL는 관계형 DBMS가 가지고 있는 거의 모든 기능을 가지고 있다. 예를 들면 SQL에서 서술적인 질의어의 사용과 질의 최적화, 동시성제어, 트랜잭션처리, 멀티 유저 기능 등을 제공하고 있다.

      고수준 확장성 : PostgreSQL는 사용자 정의 오퍼레이터와 타입, 함수, 엑세스 메쏘드를 지원한다.

      객체지향 : PostgreSQL는 상속, 객체와 같은 객체지향개념에서 볼 수 있는 여러 특징을 초보적이나마 구현하고 있다. 이러한 특징 때문에 어떤 사람들은 PostgreSQL를 설명할 때 ORDBMS라고 말하기도 한다.

    PostgreSQL는 일반적인 구조는 postmaster. postgres. frontend 의 3가지 부분으로 구성되어 있다.

      ◐ postmaster는 최상위 데몬 프로세스이다. 이것은 frontend와 backend 프로세스 사이의 통신을 담당하며, 공유버퍼 풀(공유메모리 내부에)을 할당하며. 시작 시에 다른 초기화 부분을 수행한다.

      ◐ postgres는 backend 데이터베이스 서버 프로세스이다. 질의(query)를 수행하는 등의 실제 작업을 처리한다. postmaster는 해당 frontend 접속마다 새로운 backend 프로세스를 시작시킨다. postgres backend는 항상 서버머쉰에서 수행된다.

      ◐ frontend 응용프로그램(예를들면 psql)은 아마 또 다른 머신(예를 들면 클라이언트 워크스테이션)상에서 돌아 갈수 있으며, postmaster를 거쳐서 postgres backend 에게 접속을 요청한다.

    여기에서 backend라는 용어는 어떠한 (데이타베이스)시스템에서 실질적으로 사용자의 요청을 처리하는 엔진과 유사한 부분이라고 보면 된다. frontend는 사용자의 입력을 받아 들이거나 요청을 접수하여 backend로 전달하는 인터페이스 부분을 일컫는다. PostgreSQL에서 backend는 postgres 프로세스이고, frontend는 psql 이나 여타의 PostgreSQL 사용자 응용프로그램이다.

    PostgreSQL는 정말 다양한 API를 지원한다. 이중에서 아마도 앞으로 주로 사용하게 될 API가 하나 이상씩은 있을 것이다. 마음에 드는 것을 골라서 마음껏 사용해보기 바란다.

      ·C API

      ·C ++ API

      ·Tcl API

      ·Perl API

      ·Python API

    이중에서 C와 C ++ API는 일반적인 라이브러리와 클래스 형태로 제공한다. PostgreSQL가 공개적인 성격을 띄고 있다는 점 때문에 정말 수도 헤아릴 수 없을 정도의 지원 툴이 전세계의 여러 사람에 의해 개발되어 사용되고 있다.
    PostgreSQL 내외부에서 비공식, 공식적으로 지원되는 툴이나 다양한 패키지를 잠깐 나열해보자

      ·ODBC, UDBC, JDBC 드라이버

      ·자바 레트둘, 자바 클래스

      ·WISQL- 윈도우즈 상호대화식 질의 툴

      ·ISQL- 상호대화식 질의 툴

      ·AppGEN 개발시스템- PostgreSQL 4GL 웹 데이터베이스 어플리케이션

      ·EARP - 웹 테이타 베이스 디자인 /구현 툴

      ·dbengine- 웹 인터페이스

      ·NeoSoft NeoWebScript - Apache 웹서버 모듈

      ·PHP/FI - 서버 측 html 엠베디드 스크립트 언어

      ·WDB -P95 -PostgreSQL 와 웹의 게이트 웨이

      ·ESQL/C

    이에 대한 자세한 내용을 알고 싶으면, 얼마 전에 나온 "Linux Database HOWTO" 문서를 참조하게 바란다. 다음에서 구할 수 있다.

    http://sunsite.unc.edu/LDP/HOWTO/Database-HOWUO.html

3. PostgresSQL 저작권

    PostgresSQL는 기본적으로 소스수준까지도 공개적인 성격을 띄고 있다. GPL은 아니지만 사용, 복사, 수정, 배포에 있어서 자유로우며 무료로 구할 수 있다. 아울러 COPYRIGHT문서에는, 소프트웨어 사용으로 인한 손해에 대해 어떠한 보증도 하지 않으며, 상업적인 이용이나 어떤 특별한 목적에의 사용에 대해서도 보증(warranties)을 거부한다고 명시하고 있다. 즉 상식적인 수준에서 공개 소프트웨어의 범주에 포함된다고 보면 될 것 같다.

4. PostgresSQL 의 설치

    PostgresSQL는 다음의 플랫폼에서 동작한다.

    aix IBM on AIX 3.2.5

    alpha DEC Alpha AXP on OSF/1.2.0

    BSD44_derived OSs derived from 4.4-lite BSD
    (NetBSD,FreeBSD)

    bsdi BSD/OS 2.0, 2.0.1 2.1

    dgux DG/UX 5.4R3.10

    hpux HP PA-RISC on HP-UX 9.0

    i386_solaris i386 Solaris

    irix5 SGI MIPS on IRIX 5.3

    SPARC on Linux ELF

    (For non-ELF Linux, see LINUX_ELF below)

    sparc_solaris SUN SPARC on Solaris 2.4

    sunos4 SUN SPARC on SunOS 4.1.3

    svr4 INTEL x86 on Intel SVR4

    ultrix4 DEC MIPS on Ulrix 4.4

    nextstep에서는 약간의 문제가 있다고 한다.

    part 1 PostgerSQL를 소스 파일로 설치하기

    현재까지 나온 PostgresSQL 6.1.1의소스 파일의 압축분량은 대략 2메가 이다. 소스파일의 압축을 풀면 대략 10메가정도 된다. 설치시에는 최소메모리 8메가와 소스 바이너리 사용자 데이터 베이스에 대략 45메가 정도의 디스크 공간을 필요로 한다 대용량의 데이터 베이스를 구축하지 않을 거라면 사실 이정도 까지도 필요하지 않다. 소스파일을 풀고 컴파일하여 바이너리를 둘 공간과 약간의 데이터 베이스 저장공간만 있으면 된다.

    지금 9월 30일 현재까지 나온 최신의 공식버전은 6.1.1이다 베타버젼은 6.2b11까지 나와있다. 10월 초경에는 6.2.가 나올 예정이고 12월 경에는 6.3이 나올 예정이라고 한다 사실 PostgresSQL과 다른 공개용 DRBMS를 비교해볼 때, PostgresSQL은 비표준적인 부분을 많이 지원해왔던 것이 사실이다. 그리하여 사용자 확장성은 정말 뛰어나게 되었으나 기본 표준인 ANSI SQL을 여전히 완전하게는 지원하지 못하고 있다. 아마도 그중에서 정말 요긴하게 사용되는 것은 subselects, primary/secondary key, constraint 정도 가 될 것이다. 하지만 사실 이런 기능의 대부분은 PostgresSQL에서 사용자 정의 함수와 인덱스 생성을 통하여 해결할 수 있는 부분들이다. 이제 6.2 버전부터 이러한 표준 SQL부분을 본격적으로 지원하겠다고 한다. 6.2 베타 버전에서도 벌써 테이블의 필드네에서 기본 DEFAULT 값을 지정하거나 NOT NULL키워드를 사용할 수 있다. 6.2 버전을 손꼽아 기다려볼만 하다.

    하지만 여기서는 현재까지의 공식버전인 6.1.1 의 설치를 기준으로 설명하겠다. PostgresSQL에서의 한글 사용문제도 있고 추가적인 기능은 나중에 탐미해도 충분할 것 같기 때문이다.

    이미 PostgresSQL를 설치하였다면 이 부분을 건너뛰면 된다. 괜히 본 것 또 보면 머리만 아프고 식욕만 떨어질 뿐이다.

    설치를 하기로 마음 먹었다면 PostgresSQL 사이트나 국내BBS Linux 동호회에서 PostgresSQL 최신버전을 받아오자. 예전의 Postgres 95 와 현재의 PostgresSQL 6.x 대 버전은 서로 설치방법이 조금 다르지만, PostgresSQL 6.x 대에서는 거의 같다. 혹시 베타버전을 설치하려는 분이나 며칠 있으면 나올 PostgresSQL 6.2를 설치하고 싶다면 그것으로 설치해도 상관은 없다.
    PostgresSQL 6.1.1을 포함한 이하 버전을 설치하려고 하고, 테이블 명이나 필드명에 한글을 사용하고 싶다던지, 2바이트 문자를 정규표현식으로 검색하고 싶다면, 다음 사이트에서 PostgresSQL 의 버전에 맞는 2바이트 코드 패치파일인 jp.patch.gz를 가져온다.

    ftp://ftp.sra.co.jp/pub/cmd/postgres/

    사실, PostgresSQL의 기본 설치는 ./configure, make, make install, initab 만으로도 충분하다. 물론 Postgres 이런 작업을 수행해야 한다는게 중요하다. 환경변수를 잡는다던지 여타의 것들은 이제 하나하나 설명하겠다.

      1) postgres 계정이 없다면 만든다.
      물론 이전에 만들어 두었다면 다시 손볼 필요는 없다.

      2) 디스크 용량이 충분한지 체크한다.
      가끔 희한한 에러가 나는 경우가 나는 경우를 자주 볼 경우가 있는데 이럴 경우에 'df'을 쳐보니 남은 디스크 용량이 0 이었다. 여유있게 50메가 정도의 여유분을 잡아놓고 시작해보자. 요즘에는 디스크 가격이 정말 싸다.

      3) 일단 postgresql-v6.1.1.tar.gz을 postgres 홈 디렉토리에 가져다 놓자

      4) Linux를 비롯한 몇몇 시스템에서는 flex를 사용한다.
      시스템에 있는 flex가 문제가 없는 버전인지 점검한다. 다음과 같이 친다.

        flex - version

      flex가 없다면 아마도 그것이 필요없을 것이다. 2.5.2나 2.5.4. 이상이면 O.K. 2.5.3. 이나 2.5.2. 이전의 버전이면 flex를 업그레이드 해야 한다.

      ftp://prep.ai.mit.edu/pub/gnu/flex-2.5.4.tar.gz에서 구할 수 있다.

      5) 이제 postgres 홈 디렉토리(/home/postgres)에 있는 PostgresSQL배포본의 압축을 풀어보자.

        cd
        tar xvzf postgresql-v6.1.1.tar.gz

      혹시 GUN tar가 아니면, gzip 과 tar 명령을 두번으로 나누어 사용해야 할 필요가 있을 것이다.

      6) 한글을 사용하려면
      위에서 받아둔 패치로 소스트리를 패치해야 한다. 테이블 명이나 컬럼명에 한글을 사용하지 않아도 된다면 6단계는 뛰어넘어도 된다. 물론 데이터의 내용을 한글로 사용하는 것은 이 패치를 하지 않아도 전혀 지장 없다.

        gzip -dc jp.patch.gz | patch -p0

      src/ 디렉토리에 Makefile.custom파일을 만들어서 JP=1 이라고 한 줄 적어준다.

      7) /usr/local/pgsql 디렉토리를 postgres 소유로 만들어둔다.

        su -l

        Password : ***********

        mkdir/usr/local/pgsql

        chown postgres.postgres /usr/local/pgsql

      8) 앞으로는 계속 postgres 사용자 계정으로 로긴하여 작업해야 한다!
      혹시 무의식적으로 root로 컴파일 작업을 하지 않도록 한다. 자신의 시스템이 너무나도 느린 386 시스템이거나, 다시 컴파일 하기가 정말 싫은 사람이 root 로 컴파일하는 실수를 범했다면, 다음 명령으로 아무 문제없이 사용할 수는 있다.

        chown -R postgres.postgres POSTGRES_ INSTALL_DIRECTORY

      src 디렉토리로 들어가서 ./configure를 실행하여 자신의 시스템에 맞는 사양을 고르면 된다. Linux 사용자라면 엔터만 두세 번 두들기면 알아서 잡아준다.

        cd

        cd postgresql-v6.1.1/src

        /configure

      여기에서 잠시 readline 라이브러리에 대해서 짚고 넘어가자. readline은 bash.psql 과 같은 명령행 기반 프로그램에서 히스토리 기능과 편집기능을 제공해주는 아주 편리한 라이브러이이다. readline 라이브러리는 홈디렉토리의 .inputrc에서 설정을 읽어오기 때문에 2바이트 문자를 처리하려면 ~/.inputrc 에 다음의 한 줄을 적어주면 한글을 사용할 수 있다.

        set eightbit

      readline 라이브러리는 주위에서 쉽게 구하여 설치할 수 있을 것이다.

      9) 컴파일한다.

        make

      "All of PostgreSQL is successfully made. Ready to install"이라는 메시지가 보인다면 성공한 것이다 .

        make install

      보통 별 무리없이 잘 설치될 것이다. 설치되지 않는 대부분의 경우는 /usr/local/pgsql 디렉토리를 만들어 두는 것을 깜빡 했거나, postgres 의 소유로 되어 있지 않아서 그럴 것이다.

      10) 시스템이 공유 라이브러리를 잘 찾을 수 있도록 root로 로긴하여 /etc/ld.so.conf 파일에 다음의 한 줄을 추가한다.

        /usr/local/pgsql/lib

      그리고 /sbin/ldconfig를 실행한다.
      혹시 Linux 시스템이 아닌 다른 UNIX 시스템이라면 다음과 같이 해야 할 필요성이 있을지도 모르겠다.

      bash 의 경우 : export LD_LIBRARY_PATH=/usr/local/pgsql/lib

      csh 의 경우 : setenv LD_LiBRARY_PATH /usr/local/pgsql/lib

      데이터베이스를 생성할 때 "pg_id:can't load library 'libpq.so'" 라는 메시지를 받는다면 위의 작업이 필요하다.

      11) postgre로 로긴하여 postgreSQL을 위한 환경변수 설정을 한다. 이후의 모든 작업은 postgres사용자로 로긴하여 수행하여야 한다. PostgreSQL를 사용하려면 반드시 환경변수를 설정하여야 한다. 가끔 환경변수를 설정하지 않고 PostgreSQL가 작동하지 않는다고 이야기하는 분들이 많다.

      bash 사용자라면, 다음의 내용을 ~/.bash_profile에 적어넣는다.

        PATH-$PATH:/usr/local/pgslq/bin

        MANPATH=/usr/local/pgsql/man

        PGLIB=/usr/local/pgsql/lib

        PGDATA=/usr/local/pgsql/data

        export PATH MANPATH PGLIB PGDATA

      csh 사용자라면 setenv를 사용하여 똑같이 환경변수를 설정할 수 있다.
      다시 로긴하거나 source 명령을 수행하여 환경변수를 적용시킨다.

        source~/.bash_profile

      12) 데이터 베이스를 초기화한다.

        initdb

      13) 데이터 베이스에 접근할 퍼미션을 설정한다.
      이 작업은 /usr/local/pgsql/data/pg_hba.conf를 편집함으로써 할 수 있다. 이 파일을 편집하고 난 뒤에는 반드시 read only 모드로 만들어 두자.

      14) postmaster 데몬을 수행한다.

        postmaster > server.log 2> & 1 &

      15) postgers를 부팅시에 자동으로 띄우게 하려면 다음과 같이 하면된다.
      Linux를 포함한 거의 모든 UNIX 시스템에서 /etc.rc.d 디렉토리밑에 부팅시에 수행되는 여러 스크립트들이 있다.
      그중에서 rc.local 정도의 파일에 다음과 같이 적어주면 된다.

        su postgres -c "/usr/local/pgsql/bin/postmaster -S -D /usr/local/pgsql/data "

      RedHat 리눅스 같은 경우에는 rc.d 구조가 조금 다르긴 하지만 rc.local 파일에 그냥 적어주는 것이 편하다.

      16) 이왕 말이 나온 김에 postmaster를 좀더 효율적으로 띄우는 옵션을 잠깐 살펴보자.
      postmster는 몇 가지 작업을 위해 공유 메모리를 사용한다. 기본 설정은 64버퍼로 되어 있으며 하나의 버퍼당 8K를 차지한다. 필자는 대략 4메가의 메모리인 512버퍼를 postmaster에 부여하여 사용하고 있다. 너무 적으면 성능이 조금 떨어지고, 너무 많으면 오히려 이상징후가 생길 수 있으니 자신의 시스템 사양에 맞게 적당하게 잡아두자.
      그리고 postmaster의 backend는 기본적으로 디스크 케슁을 하지 않고, 변화가 생길 때 마다 곧바로 디스크에 기록하므로 속도가 좀 느려진다. 디스크캐슁을 활성화하려면 backend 옵션('-o') 에 -F를 설정하면 된다.

      필자는 다음과 같은 postmaster 초기 부팅 옵션 값을 사용하고 있다.

        su -l postgres -c "/usr/local/bin/postmaster -S -B 512 -o -F -D /usr/local/pgsql/data "

      17) 그 외의 여러 시스템에서 필요한 사항을 잠깐 살펴보자.

        Ultrix4.x : Ultrix4.x 에 동적 로더가 없다면 libdl-1.1 패키지를 설치해야 한다. 이것은 다음에서 구할 수 있다.

        Linux : Linux-elf 는 잘 설치된다. i486이상의 프로세스를 사용하고 있다면, template/LInux-elf에 "-m486"을 컴파일 옵션에 추가할 수 있다.
        ELF가 아닌 리눅스에서는 .old 라이브러리를 반드시 얻어서 시스템에 설치해야 한다. 이 라이브러리는 postgres포트에서 동적으로 링크 로딩을 할 수 있는 능력을 부여한다. dld 라이브러리는 선사이트의 리눅스 배포본에서 얻을 수 있다. 현재의 이름은 dld-3.2.5 이다.

        BSD/OS : BSD/OS 2.0 와 2.01에서는 GNU dld 라이브러리를 설치해야 한다.

        NeXT : NeXT 포트는 Tom R Hageman tom@basil.icce.rug.nl이 제공한다.
        이 판은 공유라이브러리와 세마포어 헤더파일이 필요하다. NEXTSTEP에서 돌아가는 PostgreSQL의 바이너리 배포본도 Tom에게서 general public으로 얻을 수 있다.

      18) PostgreSQL를 운영하려면 사용할 데이터 베이스와 사용자를 등록해야 한다.
      /usr/local/pgsql/bin 에 보면 이와 관련된 프로그램이 준비되어 있다. test라는 데이터베이스를 만들려면 createdb명령을 사용하면 된다.

        $ createdb test

      linuxer라는 사용자를 등록하려면 다음과 같이 하면 된다.

        $ createuser linuxer

        Enter user's postgres ID or RETURN to use unix user ID : 514 -> [Enter]

        ls user " inuxer " allowed to create to database (y/n) y

        ls user " inuxer " allowed to create to add users?(y/n) y

        createuser : linuxer was successfully added

      linuxer라는 사용자에게 데이터베이스를 생성할 권리를 제공했지만, 또 다른 사용자를 추가할 권리를 주지 않았다. 참고적으로 이야기하면 사용자를 추가할 권리를 주지 않으면 해당사용자는 자신의 데이터베이스를 삭제할 수 없게 된다.

      createdb와 createuser에 반대되는 명령은 destrotdb와 destroyuser 명령이다. test라는 데이터 베이스를 만들었으면 이제 잠깐 테스트해 보자

        $psql test

        Welcome to the POSTGRESQL interactive sql monitor :

        Please read the file COPYRIGHT for copyright terms of POSTGRESQL

        type ? for help on slash commands

        type q to quit

        type g or terminate with semicolon to execute query

        You are currently connected to the database : test

        test => craeat table 연습(

        test -> 이름 test

        test -> 번호 int4

        test -> );

        CREATE

        test =>d 연습

      Table=연습

      Field

      Type

      Length

      이름

      text

      var

      번호

      int4

      4

      test => inster into 연습 values ('꺼벙이'.1);

      INSERT 154615

      test => inster into 연습 values ('멍청이'.2);

      INSERT 154616

      test => select*from 연습 :

      이름

      번호

      꺼벙이

      1

      멍청이

      2

      (2 rows)

      test =>
      postmaster backend에 접속하려면 반드시 해당 데이터 베이스를 명시해야 한다. 그렇지 않으면 사용자 아이디와 같은 데이터베이스를 찾으려고 할 것이다. 데이터베이스를 삭제(drop)할 때 조차도 해당 데이터베이스에 접속해 있는 상태에서는 불가능하고, 임시적인 다른 데이터 베이스에 접속한 다음에 원하는 데이타 베이스를 제거하여야 한다.
      PostreSQL의 슈퍼유저인 postgres에게는 이러한 용도로 template1 이라는 별의미 없는 데이터 베이스가 하나있다.

    part 2 PostgreSQL를 바이너리로 설치하기

    PostgreSQL를 본격적으로 활용측면에서 살펴 보기 전에 PostgreSQL를 바이너리로 설치하는 방법을 잠시 살펴본다. 바이너리는 주로 rpm으로 배포된다. 물론 데비안 페키지형식인 deb로 배포되긴 하지만 여기서는 PostgreSQL 의 rpm 배포판을 다루겠다. 필자는 주로 슬렉웨어를 사용하는 데 슬렉웨어에 rpm 패키지를 설치 관리할수 있도록 해주는 rpm 패키지를 설치하고 PostgreSQL 6.1 rpm 판을 설치하려다 잘 되지 않았다. 사용하고 있는 rpm 버전이 낮아서 그런지 모르겠다.

    PostgreSQL rpm 패키지는 역시 레드헷에서 설치가 잘된다. 국내 BBS 리눅스 동호회나 레드햇에서 PostgreSQL rpm 패키지를 쉽게 구할 수 있다.

    root로 로긴하여 일상적인 rpm 명령으로 설치하면 된다.

      $rpm -ivh pgsql61.rpm

    패키지의 이름은 다를 수 있다. 필자가 설치해본 PostgreSQL rpm 판은 관련파일을 여러곳으로 분산시키는 경향이 있었다. 바이너리는 /user/bin 에, 데이터파일과 리소스 파일은 /var/lib/postgresql에 들어간다. 이미 데이터베이스 초기화가 되어 있으므로 initdb로 할 필요없다.

    PostgreSQL rpm 패키지에는 몇 가지 문제가 있다. postmaster를 실행시키려면 퍼미션 에러가 떨어지는데 이는 다음을 수행하여 해결할 수 있다.
    물론 root로 수행해야 한다.

      $chown -R postgres /var/lib/postgresql

    또 하나의 예상치 못한 문제점은 PostgreSQL의 슈퍼유저 권한이 postgres 에게 있는 것이 아니라 deamon에게 있다는 것이다. PostgreSQL를 rpm으로 설치하고 데이터 베이스와 사용자를 아무리 추가하려고 해도 되지 않아서 data 디렉토리의 pg_user 데이터를 바리너리 에디터로 살펴보니 황당하게도 deamon으로 설정되어 있는 것이 아닌가? 패키징한 사람이 어떤 이유로 이렇게 한 것인지 알 수는 없지만 우리는 이런 상황을 바로 잡아보자 먼저 root 상태에서 deamon으로 로긴해야 한다. deamon은 일반적인 계정이 아니라 시스템의 효율적인 운영을 위해 생성되는 계정이다.

      $ su -I deamon

      $ createuser postgres

    postgres에게 데이터 베이스와 사용자 추가권한을 부여한다. 이제 postgres 계정으로 로긴하여 앞서와 마찬가지로 데이터 베이스와 사용자를 추가하면 된다. 하지만 이렇게 한다고 해서 모든 문제가 해결되는 것은 아니다. 그냥 간단하게 배우기에는 별문제가 없겠지만 데이터베이스 시스템을 구축한다는 측면에서 보면 꼭 소스파일로 설치하던지, 제대로 된 바이너리 패키지를 구해서 설치하기 바란다.

5. PostgreSQL 기초 사용법

    PostgreSQL 의 특징인 부분들을 활용하기 이전에 먼저 PostgreSQL에서 지원하는 SQL 의 기본 사용법을 잠깐 살펴보자. PostgreSQL은 아직은 ANSI SQL을 완벽하게 지원하지 않는다. 다른 자유롭게 구할 수 있는 RDBMS에 비해볼 때 표준 부분에서는 조금 떨어지는게 사실이다. 하지만, 일반적인 사용에는 전혀 지장이 없으며, 다른 RDBMS에서는 지원하지 않는 다양한 비표준기능들을 많이 지원한다.

    관계형 데이터 베이스에서는 보통 레코드(recoard)와 필드(field)라는 용어대신에 테이블(표-table), 로우(행-row), 컬럼(열-column)이라는 용어를 사용한다.
    여기서는 일반적으로 많이 사용되는 용어를 기준으로 사용할 것이다.
    먼저 다음의 내용을 자신이 편리하게 사용하고 있는 에디터로 편집해보자. 명령행에서 일일이 치는 것은 정말 짜증스러운 일이 아닐 수 없다.

    create table 날씨 (- 날씨 테이블

    도시 varchar (20)

    최저온도 int.

    최고온도 int.

    강수량 real.

    날짜 date

    ):

    insert into 날씨 values ('서울'. 10.27.0.0.'1997/10/1');

    insert into 날씨 values ('서울'. 12.25.0.12.'1997/10/2');

    insert into 날씨 values ('부산'. 13.28.0.32.'1997/10/1');

    insert into 날씨 values ('광주'. 15.25.0.73.'1997/9/28');

    insert into 날씨 values ('대전'. 10.27.0.0.'1997/10/4');

    insert into 날씨 values ('대구'. 15.23.0.15.'1997/10/3');

    insert into 날씨 values ('천안'. 9.22.0.42.'1997/10/2');

    insert into 날씨 values ('마산'. 13.24.0.01.'1997/10/1');

    insert into 날씨 values ('전주'. 12.29.0.0.'1997/10/5');

    insert into 날씨 values ('인천'. 14.23.0.25.'1997/11/2');

    이 파일을 weather.sql으로 저장한다. .
    앞으로 모든 작업은 mydb위에서 하는걸로 가정하겠다 다음과 같이 mydb를 만들어두자

      $ createdb mydb

    이제 데이터 베이스에 접속한다.

      $ psql mydb

    약간의환영 메시지가 나온다. 앞서 저장했던 SQL 질의어가 담긴 파일을 불러서 실행하는 명령은 '\i filename'이다.

      mydb=> \i weather.sql

    정상적으로 테이블을 만들고 해당 값을 삽입할 것이다. SQL 질의어에 대한 간단한 온라인 도움말은 '\ hcommand'형식으로 얻을 수 있다. psql 모니터링은 프로그램에서 제공하는 몇 가지 명령어는 '\?'를 사용하면 알 수 있다. 기억이 잘 안날 때 자주 사용하기 바란다.

    mydb => \?

    \?- help

    \a - toggle field-alignment (currenty on)

    \C []-set html3 caption (currently")

    \connect - connect to new database (currently 'ddoch')

    \copy table {from | to}

    \d [

    ] - list tables and indicies in database or columns in
    , * for all

    \di- list only indicied in database

    \ds - list only sequences in database

    \dt - list only tables in database

    \e []- edit the current query buffer or , E execute too

    \f []- change field separater (currently '|')

    \g [][] - send query to backend [end results in fname> or pipe]

    \h [] - help on syntax of sql commands. *for all commands

    \H - toggle html3 output (currently off)

    \i - read and execute queries from filename

    \I - list all databases

    \m - toggle monitor-like table display (currently off)

    \o [] []-send all query result to stdout, , or pipe

    \p - print the current query buffer

    \q - quit

    \r - reset(clear) the query buffer

    \s [] - print history or save it in

    \t - toggle table headings and row count (currently on)

    \T []-set html3.0 options (currently")

    \x - toggle expanded output (currently off)

    \z - list current grant/revoke permissions

    \! [] - shell escape or command

    mydb =>

    mydb =>\h

    type \h where is one of the following:

    abort abort alter table

    begin begin transaction begin work

    cluster close commit

    commit work copy create

    create aggregate create database create function

    create index create operator create rule

    create sequence create table create type

    create view declare delete

    drop drop aggregate drop database

    drop function drop index drop operator

    drop rule drop table drop sequence

    drop type drop view end

    end transaction explain fetch

    grant insert listen

    load notify purge

    reset revoke rollback

    select set show

    update vacuum

    type \h " for a complete description of all commands

    mydb =>

      1) select

      '날씨' 테이블에 입력한 모든 데이터를 검색해보자

        mydb => select * from 날씨 ;

      도시

      최저온도

      최고온도

      강수량

      날짜

      천안

      9

      22

      0.42

      10-02-1997

      대전

      10

      26

      0.1

      10-04-1997

      서울

      10

      27

      0

      10-01-1997

      서울

      12

      25

      0.12

      10-02-1997

      전주

      12

      29

      0.

      10-05-1997

      마산

      13

      24

      0.01

      10-01-1997

      부산

      13

      28

      0.32

      10-01-1997

      인천

      14

      23

      0.25

      11-02-1997

      광주

      15

      25

      0.73

      09-28-1997

      이번에는 최저 온도가 가장 낮은 순서대로 검색해보자

        mydb => select *from 날씨 order by 최저온도 asc;

      asc는 오름차순으로 정리하는 것이다. 내림차순으로 정리하려면 desc를 사용하면 된다. 여기에서 정렬은 order by를 사용하면 된다. 여기에서 정렬은 order by를 사용하여 최저온도에 적용하였다.

      이번에는 강수량이 0.1에서 0.3사이인 행의 도시와 강수량을 구해보자.

        mydb => select 도시, 강수량 from 날씨 where 강수량 > 0.1 and 강수량 < 0.3 ;

      도시

      강수량

      서울

      0.12

      대구

      0.15

      인천

      0.25

      다음을 10월달의 기록 중에 최저온도 최고온도의 차이가 10도 미만인 행을 찾아서 도시와 날짜와 도시와 날짜에 대한 정보를 날짜와 대한 정보를 날씨2 라는 테이블에 저장해 보자

        mydb = > select 도시,날짜 into table 날씨2 from 날씨

        mydb = > where 날짜 > = '1997/10/1'

        mydb = >and 날짜 <= '1997/10/3'

        mydb = >and (최고온도- 최저온도) < 10;

        SELECT

        mydb = > select *from 날씨2;

      도시

      날짜

      대구

      10-03-1997

      2) update

      10월 1일 날의 최저온도를 2도 더하고 최고온도를 2도 빼보자

        mydb => update 날씨 set 최저온도=최저온도+2, 최고온도=최고온도-2

        mydb => where 날짜 = '1997/10/1';

        UPDATE

      3) delete

      delete 명령은 내부 데이터를 삭제한다 테이블 전체를 삭제하려면 drop를 써야 한다.

        mydb => delete from 날씨2

        DELETE

        mydb => select * from 날씨2 ;

      도시

      날짜


        mydb => drop table 날씨2;

        DROP

        mydb => select*from 날씨2;

        WARN: 날씨2: Table does not exist.

      4) alter

      '배기 가스 유출량' 이라는 칼럼을 하나 삽입해보자.

        mydb => alter table 날씨 add column 배기가스유출량 int;

        ADD

        mydb =>\d 날씨

        Table = 날씨

      Field

      Type

      Length

      도시

      varchar

      20

      최저온도

      int4

      4

      최고온도

      int4

      4

      강수량

      float8

      8

      날짜

      data

      4

      배기가스유출량

      int4

      4


        mydb =>

      현재 PostgresSQL 6.1.1 까지의 버전에는 특정 컬럼을 제거하는 명령은 없다. 6.2 이상에서 컬럼을 제거하려면, 제거하고자 하는 컬럼을 제외한 나머지 컬럼을 모두 select 하여 다른 데이블로 저장한 다음, 이전 테이블을 삭제하고, 새로 만든 테이블을 이전 테이블의 명칭으로 변경하면 된다.

      5) 전체함수

      PostgreSQL는 count, sum, average, max min 과같은 전체함수를 지원한다.

        mydb => select max(강수량) from 날씨 ;

        max

        -----

        0.73

      6) psql의 모니터링 명령어

      psql은 libpq에 기반한 SQL 모니터링 프로그램이다. 여러 가지 다양한 기능을 제공하기 때문에 활용을 해볼 만하다. .
      psql 의 내부 모니터링 명령어 중에서 자주 사용하는 것만 설명하겠다. 나머지는 필요에 따라서 \?를 입력하여 살펴보기 바란다.

      \? : 도움말

      \a : 필드 정렬자 토글

      \C : html3 캡션 설정

      \c : 데이터베이스에 접속

      \d : 현재 데이터 베이스의 전체 테이블 또는 특정 테이블 출력

      \di :데이터 베이스 내부의 인덱스만 출력

      \ds :데이터 베이스 내부의 시퀀스만 출력

      \dt :데이터 베이스내부의 테이블만 출력

      \e : 현재버퍼에 있는 질의어나 파일을 편집

      \f : 필드 구분자 변경 (보통은 '|')

      \h : SQL 명령어에 대한 문법적 도움발출력

      \H : 질의의 결과를 html3 으로 출력할지의 여부 결정

      \i : 외부 파일에서 질의를 읽어서 실행함

      \l : 시스템의 모든 데이터 베이스를 출력

      \p : 현재의 질의 버퍼를 출력

      \q : 종로

      \r : 질의 버퍼를 청소

      \t : 헤더정보와 행의 갯수를 출력할지의 여부결정

      \T : html3.0 옵션결정

      \z : 현재의 허용/취소 권한 출력

      \! : 쉘 명령어 실행

      이중에서 \i 와 \d, \h 정도를 가장 많이 사용하게 될 것이다.

      7) psql 외부옵션

      psql 모니터링 프로그램은 아주 유용한 외부옵션을 많이 제공한다. 이걸 사용하면 쉘스크립트로 PostgreSQL를 사용한 CGI 프로그램을 간단하게 짤 수 있다.

        -c 질의어 : psql 명령행으로 들어가지 않고 질의어만 전달하여 작업할 수 있다.
        간단한 PostgreSQL작업에 유용하다.

        -d 디비이름 : 접속할 데이터 베이스를 지정한다.

        -e : backend로 보낸 질의어를 echo 한다.

        -f 파일이름 : psql 내부에서 \i 명령을 사영하듯이, 외부에서도 SQL 질의어가 담긴
        파일을 지정하여 실행할 수 있다

        -H 호스트 이름 : postmaster 가 수행되고 있는 호스트에 접속한다 기본값은
        localhost 이다.

        -l : 사용가능한 데이테 베이스 목록을 출력한다.

        -n : psql 내부 명령행에서 readline 라이브러리를 사용하지 않는다.
        한글입력에 문제가 있을 때 사용할 수 있다.

        -p 포트 : postmaster 가 돌아가고 있는 인터넷 tcp 포트를 지정한다.
        기본값은 5432이다.

        -q : 여러 가지 부가적인 메시지를 출력하지 않도록 한다.

        -s : 싱글 스텝모드로 psql을 실행한다. 질의어를 실행하기 전에 엔터키를 한번더
        쳐야 한다. 조심해야 할 작업에 사용할 수 있다.

      쉘에서 어떠한 목적으로 psql 내부에 들어가지 않고 작업을 할 수 있다.

        $ psql mydb -e -c "select * from 날씨"

      다음호에서는 실제적인 업무에서 사용될 법한 좀더 복잡한 데이터 베이스를 PostgreSQL로 다루어 보면서 활용방안을 살펴보겠다.


    <
SQL Server 2000 데이터 형식 Oracle 데이터 형식
bigint NUMBER
binary LONG RAW NOT NULL
bit NUMBER (1, 0)
char VARCHAR2 (900) NOT NULL
datetime DATE
decimal NUMBER (255, 3) NOT NULL
float FLOAT NOT NULL
image LONG RAW
int NUMBER (255, 3) NOT NULL
money NUMBER (255, 3) NOT NULL
nchar VARCHAR2 (2000) NOT NULL
ntext LONG
numeric NUMBER (255, 3) NOT NULL
nvarchar VARCHAR2 (2000) NOT NULL
real FLOAT NOT NULL
smallint NUMBER (255, 3) NOT NULL
smalldatetime DATE NOT NULL
smallmoney NUMBER (255, 3) NOT NULL
sql_variant LONG
sysname CHAR(255)
text LONG
timestamp RAW (255)
tinyint NUMBER (255, 3) NOT NULL

Oracle 데이터 형식 정의

다음은 Oracle 데이터 형식 정의 목록입니다.

Oracle 데이터 형식 정의
CHAR <=2000
DATE 4712 B.C. 1월 1일 - 4712 A.D. 12월 31일
DECIMAL Number와 동일
FLOAT Number와 동일
INTEGER Number와 동일
LONG <=2GB
LONG RAW 원시 데이터. Long과 동일
LONG VARCHAR Long과 동일
NUMBER 1.0E-130부터 9.99..E125까지
SMALLINT Number와 동일
RAW 원시 이진 데이터 <=255바이트
ROWID 고유 값
VARCHAR2 <=4000바이트
VARCHAR Varchar2와 동일
BLOB 대용량 이진 개체 <=4GB
COB 대용량 문자 개체 <=4GB
NCLOB Clob(멀티바이트용)과 동일
BFILE 이진 연산 파일에 대한 포인터
Posted by 나비:D
:

DBHelper Plugin User’s Guide

2007. 12. 18. 09:18
http://ca.geocities.com/davidhuo2003/dbhelper/userguide.htm


DBHelper Plugin User뭩 Guide

David Huo

What is DBHelper plugin. 1

Why is it developed. 2

Features. 2

License. 3

Getting started. 3

Installation. 3

New file types. 3

SQL ?Syntax highlighted SQL Script file. 3

DIA ?The Database Diagram File. 4

Configure the Database Profile. 4

Browsing Database Meta Information. 8

Find Usages of a table or stored procedure. 12

View/Update Table Data. 13

Edit SQL Script 14

Using the SQL Code Completion. 15

Run SQL Script 16

Save SQL Script 17

View Database Schema in Diagrams. 18

Advanced Topics. 20

Database Meta Data is presented as JavaBeans. 20

Extending DBHelper with Velocity Templates. 20

How the templates are organized. 20

How to write Velocity templates for DBHelper 22

Some useful templates. 23

Extending DBHelper Meta Information using Java. 23

Adding meta-data in the JavaBean class using Property annotation. 23

Implementing IMetaProvider interface. 24

How to build the plugin jars: 24

Contact information. 25

Send your questions and comments to: 25

dbhelper@gmail.com.. 25


What is DBHelper plugin

DBHelper is an IDEA plugin, which aims to extend IDEA IDE to support SQL language programming and database schema desgin. The current version is developed and tested under IDEA 5.1.2 and IDEA 6.0.1. The new builds are tested under IDEA 6.0.1 now.

Why is it developed

As an IDE for Java development, IDEA has done a great job. However many projects or applications are backed with databases. When the IDEA users are working with SQL programming and database, they have to find other solutions. I don뭪 know how many times that I wanted a nice integrated database tool which could come with IDEA and offer some nice features, such as SQL code completion, syntax highlighting and so on. I decided to write a plugin to add SQL programming support in IDEA. This is the preview release and I have planned many features to be added in the future. The following features are available in this release.

Features

1)      Adding two new file types IDEA can recognize:

a.       SQL ?The SQL script file

b.      DIA ?The database schema diagram file

2)      Basic syntax highlighting ?Supporting keywords, single line comments, /** **/ style multi-line comments, strings and number. The keyword is updated dynamically based on the database you are working with.

3)      Code completion:

a.       Supporting basic completion: Hit Ctrl + Space lists all the objects in the current database and narrows down as the user typing

b.      Correlation name completion: When the user hits ?? it will resolve the correlation name and pops up the suggestions, such as catalogs, schemas, table columns and stored procedures. It can also resolve SQL correlation name, temp tables, declared variables and parameters (works for SQL iAnywhere or ASE T-SQL format)

4)      Run SQL script inside IDEA editor ?At any time, the user can highlight a block SQL script or run the whole SQL script in IDEA editor and the result will show in the DBHelper output panel.

5)      View Database schema as diagram ?At any time, the user can select multiple tables or a type of tables and view the schema in a graphical diagram. The diagram can be saved as DIA format or copied as image.

6)      Update table data ?The user can view the data of any table and insert/delete/update the table data.

7)      Support multiple databases via standard JDBC interface, tested databases are:

a.       Sybase SQL Anywhere (tested on version 9.x)

b.      Sybase ASE (tested on version 12.x)

c.       MySQL (tested on version 5.x)

d.      SQL Server (tested on version 2000)

e.       Oracle (tested on 9i)

Extra database meta data can be supported by adding plugin jars to DBHelper (Implementing IMetaProvider interface, see ASA user meta extension sample)

8)      It is designed to be extended using Velocity templates. (Velocity is an open source apache project for generating text content based on a simple template). Uses can add templates to generate customized content based on the database meta data, such as generating XML data based on resultset, or JDBC call to retrieve the resultset from the database. There are some templates come with this release as examples.

9)      SQLConsole is newly added to support users that primarily don뭪 write lots of stored procedures and only want to run some simple queries inside IDEA. Users can open SQLConsole in DBOutput tool window and run any SQL queries. Of course syntax highlighting and SQL code completion are also available in the SQLConsole.

10)  Query Manager: Users can create new or update queries in DBOutput tool window Saved Queries tab.

License

젨젨젨젨젨?The plugin is under Apache License and free to use.

Getting started

Installation

The plugin consists of three jar files and they are packaged as a zip file. To install it, the user needs to unzip the zip file to %IDEA%\plugins and restart IDEA.


After restarting IDEA, the user should see two new tool windows: DBHelper is on the left side along with project, structures. DBOutput is on the bottom along with ?span class=SpellE>ToDo?and 밊ind?tool windows.


The DBHelper tool window is a panel with three tabs:

1)      DBTree ?A tree view of the databases structures

2)      Category View ?A categorized view of selected database with quick search feature

3)      Settings ?A tab to configure DBHelper, such as databases, template locations


The DBOutput is a tabbed panel to display SQL resultset, it has two build-in tabs:

1)      Console ?It displays the SQL statement is running and the time it used

2)      QueryManager ?It holds all the saved query and the user can select or search the saved query and run it again

If the user runs a SQL statement that generates resultsets, the resultsets will be added to the output panel as a new tab.

New file types

With DBHelper installed, IDEA can work with these two new file types:

SQL ?Syntax highlighted SQL Script file

The user can edit/save SQL file as other file types in IDEA main editors (Not in a small separate panel). SQL code completion is integrated in the SQL editors.


DIA ?The Database Diagram File

The user can generate DIA files by reversing meta data from the connected database and save it as DIA file format or layout the diagram and copy the content as an image. The image can be pasted into other document editors, such as MS Word. Adding new tables and changing the database schema are planned in future release.


Configure the Database Profile

To get started, the user needs to configure the database profile that he/she will work with.

1)      Go to the Settings tab in the DBHelper tool window:

2)      Right-click the databases icon in DBTree and select 밃dd Database? It will bring up the database profile editor:


3)      The user can click the 밄rowse?icon beside the driver dropdown-listbox to add vendor JDBC jar files. 밬se Full Object Name?tells DBHelper how to generate database object names, such as table and stored procedure names. If it is checked, DBHelper will use full name, which is catalog.schema.object to reference an object; otherwise only the object name will be used. Depends on the URL or the database the user is using, you should uncheck/check this option. For example, if you use MySQL 5, the URL can be either: jdbc:mysql://localhost/ ?without a database name or jdbc:mysql://localhost/test ?with a database name. If you don뭪 give the database name, you have to check 밬se Full Object Name?option to get the access to the object. If the database name is specified in the URL then you can uncheck this option to make the object names shorter. Another reason is that some database doesn뭪 support using catalog in the database name but it does report the object belongs to a catalog, such as H2Database. In this case, you have to give the URL with database specified and uncheck this option. This option is changeable at any time.

4)      If you think adding extra jar files for each database profile is very cumbersome. You can add global jar files in the 밪ettings?tab in the DBHelper tool window or in IDEA Settings dialogbox and select DBHelper.


5)      The user should specify user, password fields as well. Extra options can be defined in the Additional tab area, and these values will be added as connection properties.


6)      Click OK to save the database profile. At any time the user can click the database profile item in the DBTree panel and select 밇dit Database Profile?to edit it.


7)      Other fields: After the database profile is saved, the user can click the database profile and view the properties of the profile in the property panel:


젨젨젨젨젨?There are some other fields that the user can change:

a.       maximumRowsToRetrieve: To specify maximum rows DBHelper will retrieve for a query.

b.      metaProvider: The user can write its?own meta extension and add extra nodes under each database node in the DBTree view and Category view. The extension should be packed as jar files and added in the jars field. Once the jar files are added, clicking the metaProvider field will bring up all the extension classes, which implements the IMetaProvider interface.

c.       procedureSyntaxQuery: To specify a query that returns the stored procedure syntax. The query is expected as a valid Velocity template and returns the stored procedure body as the resultset. The procedure name can be referenced as $name in the template. For example, this query returns the a given stored procedure syntax for MS SQL Server:

EXEC sp_helptext $name

젨젨젨젨젨젨젨젨젨젨젨?Note: Defining this field can help DBHelper뭩 find usage function work better because it can search stored procedure bodies to find table or stored procedure references.


Browsing Database Meta Information

Database meta data are presented as a tree view in the DBTree tab and list view in the category view in the DBHelper tool window. Under the treeview or listview, there is a property view panel below it shows the current selected object properties. The property panel can have two types of views: 1) Sortable view: the user can click the title of the columns to sort the data 2) Categorized view: the user can view the information based on categories and close/expand any of the categories. DBHelper uses all standard JDBC database meta API to retrieve the meta data. If the property is an array field, clicking the ?button will bring up a dialog box to show the elements in the array field, for example, columns in a table or indexes in a table are presented in this way.


DBTree view


Category view


Viewing a property of array type.


The user can select 밪et Filter?in the table type folders or stored procedure folder to specify filters based on catalog and schema. The sub-items will be filtered based on the selected items in the filter setting dialog box.


Find Usages of a table or stored procedure

The user can search the references of a given table or stored procedure in the database by right-clicking a table or stored procedure and select 밊ind Usages?


Check the search options and click search. DBHelper will start a search thread and search the references for the given object and show a search result in the DBOutput tool window:


The search result will tell the user the reference object name, type and line number (If it is a stored procedure). On the right-hand there is a syntax highlighted code viewer to show the stored procedure syntax and the referenced line is marked in red.


Note: It is important for the user to specify the procedureSyntaxQuery in the database profile so that the find usage can search stored procedures.

View/Update Table Data

If the resultset is generated by 밮iew table data?menu action, the resultset is editable. The user can update/insert/update multiple rows and synchronize with the back-end database after he/she clicks the 밇dit?icon.


If the resultset is generated by a typed SQL command, the resultset is read only by default. If the user knows the resultset columns are from only one table. The user can click the edit button and specify the table to update.


The result panel also shows how many rows are in the resultset on the right-up corner. If the user clicks the resultset rows button, it will show a resultset metadata dialog showing column count and data type of each column. The user can check/uncheck the first column to hide/show the columns in the resultset.


Note: If some columns are filtered by the user, it also affects some templates running results. For example, 밅opy as Inserts?will only generate the selected columns in the insert statements, similar as 밅opy Row?and ?span class=SpellE>ToXml?templates. If the user wants to write any resultset related templates, he/she should reference these existing templates to see how to take the filter account.

Edit SQL Script

The user can create new SQL file or open existing SQL file in the same way working with Java files in IDEA. Each SQL file editor is associated with a database profile so that the code completion module knows from where to retrieve the database meta-data. To associate a database profile to the SQL editor, the user needs to select the menu: Tools->Select Database:


I recommend the user to connect the database first and then select the database profile. If the database is connected, the keywords in the SQL editor will be updated based on the keyword list returned by the database meta-data. If the SQL is not associated with any database profile or the database is not connected, the code completion will only suggest the SQL92 keywords.


Note: This select database dialog box will show up only when the current active editor is holding a SQL file.


Using the SQL Code Completion

DBHelper supports two types of code completion:

1)      Basic completion: At any time the user can hit Ctrl + Space to popup the completion list. The list includes: keywords, catalogs, schemas, tables, views, stored procedures, and system functions. The items are narrowed down as the user is typing. This isn뭪 any suggestions if the users hit the hotkey in SQL comments and strings.

2)      Correlation completion: If the user hits ??after an identifier, DBHelper will try to resolve the identifier to see if it is catalog, schema, table or temp table. It will suggest corresponding child items if the identifier is resolved successfully. For example, it will pops up column list if the identifier is a table.

3)      Complete last completed table뭩 columns: DBHelper remembers the last table the user used from the suggestion list and Ctrl + L can bring the column list of the table.

DBHelper resolves the 밻?is a correlation name of the employee table and brings up the columns of the employee table.


The suggestion list is a multi-selection table; the user can select multiple items by clicking with Ctrl key down and the completion items will be inserted as item1, item2 ?/p>


The bottom bar of the completer windows shows the database the SQL editor is currently associated with.


Hint: When the completion list is showing, the user can hit tab key to drill down to the lower level of the current selected item, for example, if the current selected item is a table, the tab key will change the list items to the columns of the table.


Hint: When the completion list is showing, hit Ctrl + A will select all items in the list and the completion will skip the ??item if there are multiple items are selected.


Run SQL Script

At any time, the user can run the highlighted a block of SQL script or the whole SQL script by pressing Ctrl + F10. The SQL statement and execution time will be displayed in the DBOutput tool window console tab and the resultset will be added as a new tab in the DBOutput tool window if there is any.


The user can also select 밢pen a SQLConsole?in the DBHelper menu to open a SQLConsole in the DBOutput tool window. It is a split panel. The resultsets will be shown as tab pages on the left-hand side and a syntax highlighted SQL code editor is on the right-hand side. Press Ctrl-Enter to run the current SQL statement and use the database dropdown-list to select the database you want to work with.


Note: When there is a SQL statement still running, the user can뭪 run another SQL statement. DBHelper will tell the user there is one statement running and the user has the choices: 1) Wait until it finishes 2) Discard the current one and run the new SQL script


Save SQL Script

By clicking the 밪ave Query?icon on the resultset tab, the SQL script can be saved and run again later. The saved queries are displayed in the 밪aved Queries?tab in the DBOutput tool window. By clicking the title of each column, the queries can be ordered in ASC or DESC order. The user can also click the edit icon to edit the saved query in a query editor which is similar as a SQLConsole except the database dropdown list is disabled if the query뭩 database name is found in the current database profile list. The user can create new queries by clicking the new query icon.

View Database Schema in Diagrams

If the user selects multiple tables in the DBTree view or Category view, there is an item on the right-click menu saying: 밮iew Tables Diagram? Click this menu item will generate a graphical view of these tables schema. The action will also add those tables that have relationships with these selected tables in the diagram.


Tables are automatically laid out based on the relationships and the size and locations of the object can be adjusted by dragging the icons. The diagram is named based on the database. The user can save it or save it as anther file name. There are also functions to help finding the object in a large diagram ? 밊ind Object?right-click menu item can bring up the following dialog box and the user can type the search condition and locate the object.


Advanced Topics

Database Meta Data is presented as JavaBeans

All the database meta-data objects, such as Table, Column, Primary Key, Foreign Key, Index, Procedure, Procedure Parameter/Result Column and so on are all JavaBeans. Child objects are collected as one-dimensional arrays. For example, Table.getColumns() returns an array of Column objects.

Extending DBHelper with Velocity Templates

One important benefit that DBHelper offers is that it presents the database meta-data in JavaBean format and the user can use Velocity Templates to access the meta-data information and generate proper content for its own needs.

How the templates are organized

The user can specify the folder where all the templates are stored in the Settings tab in the DBHelper tool window:


DBHelper looks for a meta-file called templates.xml under this folder. The meta-file describes all the templates under this folder.

<templates>

<template name="Generate SQL script for these tables" database="ianywhere" target="tables" file="asa/SQLAnywhere.vm" />

<template name="Update Statement" target="table" file="asa/updateTable.vm" />

<template name="Update Statement (ASA)" database="ianywhere" target="table" file="asa/updateTable.vm" />

<template name="Copy Row" target="resultset" file="copyRow.vm" />

<template name="Generate JDBC Call" target="procedure" file="jdbcCall.vm" />

<template name="JDBC Call for this resultset" target="resultset" file="jdbcCallforResult.vm" />

<template name="Parameter Test" target="table" file="test_params.vm" />

<template name="To XML" target="resultset" file="toXml.vm" />

</templates>


Each template entry describes a template file. The meaning of these attributes is described in the following table:

Attribute Name

Meaning

Required

name

The name of the template and also it is the menu item text in the popup menu to run this template

Y

database

The target database that this template is used for. The value must be found in the JDBC driver뭩 class name. For example ?span class=SpellE>ianywhere? is part of ASA JDBC driver class name.

N

target

The object type that the template expects as the render parameter $target. Possible values:

1)      tables ?the template will receive an array of Table object as $target value

2)      table ?$target is the selected table object

3)      procedure -- $target is the selected stored procedure

4)      resultset -- $target is a JTable holding a resultset using ResultModel table model.

Y

file

The template file name.

Y


How to write Velocity templates for DBHelper

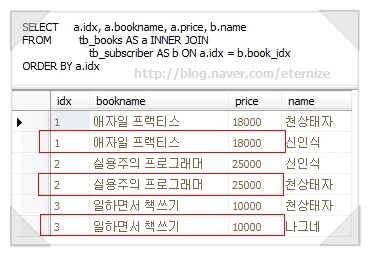
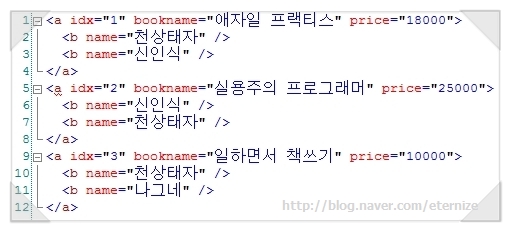
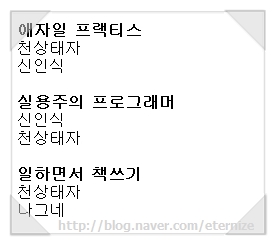
Here is an example of generating XML data based on the selected rows in a resultset tab in the DBOutput tool window:

1) Add this line in the templates.xml

<template name="To XML" target="resultset" file="toXml.vm" />

2) The template looks like this:

?/span><result>

#set($rows = $target.getSelectedRows())

#set($cols = $target.getModel().Columns)

#foreach($row in $rows)

#set($colId = 0)

<row #foreach($col in $cols )

#set($t = $col.type)

#set($value = $target.getValueAt($row, $colId) )

$col.name="#if( $target.getValueAt($row, $colId) )$value.replaceAll("&", "&amp;").replaceAll("<", "&lt;").replaceAll(">", "&gt;")#end" #set($colId = $colId + 1 )#end#set($cols = $target.getModel().Columns)>

#end

</result>


The output will be put in clipboard as this:

<result>

<row dept_id="100" dept_name="R &amp; D" dept_head_id="501" >

<row dept_id="200" dept_name="Sales" dept_head_id="902" >

<row dept_id="300" dept_name="Finance" dept_head_id="1293" >

<row dept_id="400" dept_name="Marketing" dept_head_id="1576" >

<row dept_id="500" dept_name="Shipping" dept_head_id="703" >

</result>


Sometimes, the user wants to get extra input before the template is running, then the user should define the template parameter in this format:

$runtime_xxx(default value). If you need to use the same parameter multiple times, there is only one need to specify the default value and the one with default value should be put in velocity comment ##.


For example, if the user adds $runtime_tableName in the template file and invokes the template, the following dialog box will show up and asks for the value of tableName:


The template files are monitored and changing the template will take effect without restarting IDEA. If the user changes templates.xml, reset the template folder in the Settings tab will force DBHelper to reload all templates.

Some useful templates

There are some templates come with this release as examples:

Name

Target

Description

toXml

resultset

Copy the selected rows in the resultset in XML format

Copy as Inserts

resultset

Copy the selected rows in the resultset as insert statements

Copy Row

resultset

Copy the selected rows values

GetAsSQLCursor

resultset

Generate a cursor statement to go through the resultset

JDBC Call for this resultset

resultset

Generate JDBC call to retrieve the resultset

Generate SQL script for these tables

Tables

Generate SQL script to create tables and references based on a Diagram (ASA syntax)


Extending DBHelper Meta Information using Java

If the user wants to see some database specific meta-data information, such as users, groups, triggers and so on, he/she needs to write an extension, which implements IMetaProvider interface. The database objects should be presented as JavaBean objects without any collection data type in it. Collection of data should be in standard array data type.

Adding meta-data in the JavaBean class using Property annotation

DBHelper provides an Annotation interface called: Property to add meta-data into the database JavaBeans so that they can be displayed more efficiently in the property panel:


public @interface Property {

젨?String editor() default ""; // specify the bean editor class name for this property

젨?String name() default "";

젨젨 int ordinal() default -1; // specify the ordinal in the JDBC resultset to map the value to

젨?boolean expose() default true; // specify if the property editor should display this property

젨?String propertyName() default "";

젨?String mappedName() default ""; // specify the JDBC resultset column name to map the value to

젨?String category() default ""; // specify the category name for the categorize view

젨?String className() default "";

젨?LabelTag[] tags() default {}; // specify the tag values for the bean editor

젨?String desc() default "";

젨?boolean xmlCDATA() default false;

젨?boolean xmlAttr() default true;

젨?String defaultClassNames() default "";

젨?boolean editable() default false; // specify if it is editable using property editor

}


If the user gives ordinal or mappedName in the bean class write methods. The mapping from a JDBC resultset to the bean objects can be done easily by calling:

static <T> List<T> rsToList(ResultSet rs, Class<T> theClass)

in BeanUtils class.

Implementing IMetaProvider interface

public interface IMetaProvider {

젨?List<IDBNode> getNodes(AbstractDBObject.DatabaseNode db);

}


DBHelper will give the database node the extension will be added on. The easiest way to implement IDBNode interface is to use AbstractDBObject and overwrite populateChildren() method to populate all the child nodes.


Note: The user must call setParent(IDBNode n) for each node to maintain the proper parent/child chain.


For more information about adding extension nodes, please see the ASAUser example comes with this release.

How to build the plugin jars:

1)      Download the source code and modify the dbhelper.properties file to use proper IDEA install folder

2)      ant -f DBHelper.xml to build dbhelper.jar

3)      ant -f DBHelper.xml dist to build the plugin zip file

Note: There other two jar files are JDK XML stream API jar files. If you use JDK 1.6, you don뭪 need these two jar files.


Contact information

Send your questions and comments to:

dbhelper@gmail.com


1
Posted by 나비:D
:

package net.skql.user;

import java.sql.*;

public class ConnectionManager {
 private Connection conn = null;
 private Statement stmt = null;
 private ResultSet rs = null;

 //ms-sql jdbc드라이버 로드
 static final String msjdbc_driver = "com.microsoft.sqlserver.jdbc.SQLServerDriver";  //구문 주의 2000과 틀리삼 ㅡ.ㅜ
 static final String msjdbc_url = "jdbc:sqlserver://127.0.0.1:1433;";
 
 //ms-sql id, password
 private static String msid = "sa";
 private static String mspassword = "1234";
 private static String msdatabase = "testdb";
 
 String url = msjdbc_url;
 
 /**
  * Name : ConnectionManager
  * Desc : 생성자
  */
 public ConnectionManager() {}
 
 public void getDB(dt sqo ) throws Exception{
  String sql = "select * from Comm_member";
 
  try{
   Class.forName(msjdbc_driver);
  }catch(ClassNotFoundException ce){
   System.out.println(ce);
  }
 
  try{
   conn = DriverManager.getConnection(url, msid, mspassword);
   stmt = conn.createStatement();
   rs = stmt.executeQuery(sql);
   while(rs.next()){
    System.out.println(rs.getString(1));
   }
   
  }catch (SQLException se){
   System.out.println(se);
   
  } finally {
   disconnectDB(); //DB와 연결을 끊는다.
  }
 }
 
 public void disconnectDB() throws Exception{
  try{
   conn.close();
   stmt.close();
   rs.close();
  }catch(SQLException se){
   System.out.println(se);
  }
 
 }
 
 public static void main(String[] args){
  ConnectionManager db = new ConnectionManager();
  try {
   db.getDB();
  } catch (Exception e) {
   // TODO Auto-generated catch block
   e.printStackTrace();
  }
 }
 
}

Posted by 나비:D
:

[Oracle] Qry Tunning

2007. 12. 17. 17:36
출처 카페 > http://sqlplus... / 네오
원본 http://cafe.naver.com/neocip/178

1. 시스템을 파악

   - 데이터의 성격을 명확히 알아야만 한다.
   - 튜닝 방법을 선택하기 위한 체크리스트를 작성한다.
   - 사용하는 SQL 쿼리를 분석한다.
     1) SQL*PLUS 에서 "set autotrace on" 명령을 수행하고 TKPROF를 이용하여 분석한다.
     2) 문제가되는 SQL 문의 explain plan을 조회한다.
     3) "set timing on" 명령을 수행하여 실행 시간을 검사한다.

   ** 한 세션만 트레이스를 거는 방법
      1) select sid, serial# from v$session where username='SCOTT'; 해당 유저의 id를 알아낸다.
      2) execute dbms_system.set_sql_trace_in_session({SID},{Serial#},TRUE);


2. Analyze 를 한다.
   Optimizer의 파싱연산을 더욱 정확하게 수행토록 유도할 수 있다.

   -Analyze table [table 명] compute statistics;   테이블 전체 연산.
   -Analyze table [table 명] estimate statistics;  테이블이 큰 경우 1064row 까지만 연산.
   -Analyze table [table 명] delete statistics;    이전 연산결과 삭제.
   - 한 유저의 모든 테이블을 분석할경우
     exec dbms_utility.analyze_schema('SCOTT','COMPUTE');


3. Hint 를 사용한다.

   - table Full Scan을 유도
     select /*+ FULL(table_name) */ column1, 2 .. from table_name ... ;

   - index 사용을 유도
     select /*+ INDEX(table_name index_name1, 2 .. ) */ column1,2 .. from table_name ... ;

   - table 을 순서대로 조인하도록 유도
     select /*+ ORDERED */ column1,2 .. from table1, table2 ... ;    

   - Cost-based 연산시 또는 모든 row 를 캐쉬하도록 유도(인덱스를 사용 않하도록 유도)
     select /*+ ALL_ROWS */ .... ;

   - Cost-based 연산시 응답속도를 빠르게 하기위해 (인덱스 걸린 컬럼 쿼리시)
     select /*+ FIRST_ROWS */ .... ;


4. 인덱스를 생성/삭제 한다.

   EX1) 인덱스가 항상 좋은가 ??
       EMP 테이블은 10만건의 데이터가 있고 DEPT_NO=10 것은 2만5천건
       존재한다고 할때 수행시간 비교.

    select ENAME from EMP where DEPT_NO=10;
      
   1) 인덱스가 없을때 : 약 55초 소요
   2) 인덱스가 있을때 : 약 70초 소요
   3) dept_no, ename 의 복합 인덱스가 있을때 : 약 0.1초 소요.
      (단, ename은 unique)

   ** 인덱스가 걸리는 컬럼은 중복값이 적은것이 좋다. 만일 전체의 25% 이상의 중복
      값을 가지는 값을 쿼리시 시간이 더 걸리게 된다.


   EX2) 인덱스와 힌트의 적절한 사용....
       EMP 테이블은 1만건의 데이터가 있고, DEPT_NO에 인덱스가 걸려있고,
       DEPT_NO>9990 것은 5천건 존재한다고 할때 수행시간 비교.

    select ENAME, DEPT_NO from EMP where DEPT_NO>9990;
     -> 약 53초 소요

    select /*+ FULL(EMP) */ ENAME, DEPT_NO from EMP where DEPT_NO>9990;
     -> 약 4초 소요


   EX3) join 테이블의 쿼리시 속도비교
        EMP 테이블은 10만건, DEPT 테이블은 10건의 데이터가 있을때.

    select ENAME, DEPT_NO from EMP, DEPT
    where EMP.DEPT_NO = DEPT.DEPT_NO and EMP_NO=5 and DEPT_NO=10 ;
     -> 약 4분 소요 된다면

    select /*+ ORDERED */ ENAME, DEPT_NO from EMP, DEPT
    where EMP.DEPT_NO = DEPT.DEPT_NO and EMP_NO=5 and DEPT_NO=10 ;
     -> 약 15초 소요
 
    select ENAME, DEPT_NO from EMP where EMP_NO=5 and EXISTS
             ( select 'X' from DEPT where EMP.DEPT_NO = DEPT.DEPT_NO
                          and DEPT_NO=10 ) ;
     -> 약 8초 소요

     ** Exists, Union 등의 연산자는 속도를 개선시켜줌.


5. 테이블을 조정한다.


=> union 을 쓰면 프로그램 속도가 아주 저하될 수도 있으므로 피한다.(인덱스를 탄다면 문제없음.)

=> IN 대신 Exists를 사용하면 속도를 개선한다.

Posted by 나비:D
:

toad로 oracle 10g 에서 데이타를 읽어 오는데
한글이 깨지고 지랄이다.

datagrid 부분에 한글이 깨지면,

아래 경로에 작성하여 주면 된다.
나의 경우 아래 경로에 값이 존재 하지 않아 추가 해주었다.

작성하고 toad 새로 실행하니 바로
한글이 올바르게 표현 되었다.

키이름은
HKEY_LOCAL_MACHINE\SOFTWARE\ORACLE

에 문자열값
NLS_LANG

값 데이타
KOREAN_KOREA.KO16MSWIN949

이다.


출처) http://quri.egloos.com/1478683 쿠리님

Posted by 나비:D
:

[Oracle]CREATE TABLE

2007. 12. 17. 09:47

CREATE TABLE A1_Prof(

             PID        char(4) PRIMARY KEY,

             PName   char(10) not null,

             PDept    char(15)

);


CREATE TABLE A1_Student(

             ID          char(9)   PRIMARY KEY,

             Name     char(10) not null,

             Dept      char(15) not null,

             Grade    number(5) not null,

             PID        char(4)   REFERENCES A1_Prof(PID)

);


CREATE TABLE A1_Curriculum(

             SubjectID            char(10) PRIMARY KEY,

             SubjectName      char(20) not null

);


CREATE TABLE A1_Score(

             ID                        char(9),

             SubjectID            char(10),

             Score                 number(5)  Default 0 not null,

             PRIMARY KEY (ID, SubjectID),

             FOREIGN KEY (ID) REFERENCES A1_Student(ID),

             FOREIGN KEY (SubjectID) REFERENCES A1_Curriculum(SubjectID)

);


CREATE TABLE A1_Customer_Info(

             CID        char(6)  PRIMARY KEY,

             Name     char(10) not null,

             Address             char(20) ,

             Tel        char(15) ,

             Bday      date       not null,

             SID        char(14)not null,

             Job        char(10) ,

             Sex        char(1)  not null,

             Married  number(1)

);


CREATE TABLE  A1_Customer_OnlineInfo( 

             CID        char(6) ,

             LID        char(20) not null,

             LPW       char(15) not null,

             Email     char(20) ,

             Jday       date not null,

             PRIMARY KEY (CID),

             FOREIGN KEY (CID) REFERENCES A1_Customer_Info(CID) 

);


CREATE TABLE A1_Product(

             PID        int PRIMARY KEY,

             Name     char(15) not null,

             Cor        char(20) not null,

             UnitPrice int  not null,

             Holding   int  not null,

             Photo     char(20)

);


CREATE TABLE A1_Region(

             RID        number(5) PRIMARY KEY,

             LRegion char(10) not null,

             SRegion char(10) not null

);


CREATE TABLE A1_Store(

             SID        number(5) PRIMARY KEY,

             Name     char(20) not null,

             RID        number(5)  REFERENCES A1_Region(RID)

);


CREATE TABLE A1_Sales(

             SaleID    number(5) PRIMARY KEY,

             PID        number(5)REFERENCES A1_Product(PID),

             SID        number(5)REFERENCES A1_Store(SID),

             CID        char(6)REFERENCES  A1_Customer_Info(CID),

             SDay      date  not null

);


CREATE TABLE A1_sales_return(

             returnday            date not null,

             returnreason       char(30) not null,

             saleid                 number(5) REFERENCES A1_store(sid)

);


CREATE TABLE A1_customer_score(

             cid char(6) REFERENCES A1_customer_info(cid),

        score number(6)  default 0 not null

);


Posted by 나비:D
:

AdventureWorks 예제 데이터베이스를 활용한 SQL Server 2005 학습 가이드


--------------------------------------------------------------------------

1. 최신(2006.04월 업데이트) 예제 데이터베이스와 샘플을 다운로드 받는다


http://www.microsoft.com/downloads/details.aspx?familyid=e719ecf7-9f46-4312-af89-6ad8702e4e6e&displaylang=en


2. 예제데이터베이스 설치/제거방법


- AdventureWorksDB.msi(OLTP용 예제)  --> BI 용 예제는 AdventureWorksBI.msi

AdventureWorksDB.msi 에는 AdventureWorks OLTP 데이터베이스 파일이 포함되어 있습니다. 새로운 버전을 설치하기 전에 이전에 설치된 AdventureWorks 데이터베이스는 완전히 제거해야 합니다.


이전 버전 AdventureWorks 데이터베이스를 제거하려면,

1) AdventureWorks 데이터베이스를 Drop 한 다음,

2) 프로그램 추가/제거 애플릿을 사용하여 AdventureWorksDB를 선택하고 제거를 클릭합니다.


Setup 프로그램을 사용하여 AdventureWorks 데이터베이스를 제거하기 위해서는

1) AdventureWorks 데이터베이스를 Drop 한 다음,

2) 프로그램 추가/제거 애플릿에서, MS SQL Server 2005를 선택하고 변경을 클릭합니다.

3) 구성요소 선택에서 워크스테이션 구성요소를 선택한 다음, 다음을 클릭합니다.

4) SQL Server 설치 마법사 첫 화면이 나타나면, 다음을 클릭합니다.

5) 시스템 구성 검사가 나타나면, 다음을 클릭합니다.

6) 인스턴스 변경 또는 제거 화면이 나타나면, 설치된 구성 요소 변경을 클릭합니다.

7) 기능 선택화면에서, 설명서, 예제 및 예제데이터베이스 노트를 확장합니다.

8) 예제 코드 및 응용 프로그램을 선택합니다.

9) 예제 데이터베이스를 선택하고, "모든 기능을 사용할 수 없습니다."를 선택하고, 다음을클릭합니다.

10) 설치를 클릭하여, 설치 마법사를 완료합니다.


SQL Server 인스턴스가 하나 이상 설치되어 있는 경우에서는 MSI에서 지정하는 디렉토리를 해당 인스턴스의 master 데이터베이스가 위치하는 디렉토리와 동일하게 수정해 주어야 합니다. master 데이터베이스의 위치를 확인하기 위해서는, Express Manager나 SQL Server Management Studio에서 AdventureWorks 데이터베이스를 설치하고자 하는 인스턴스에 연결한 다음, 다음 쿼리를 실행하면 됩니다.

select physical_name from sys.database_files where name = 'master'


예제 데이터베이스와 예제 코드를 사용하기 위해서는, Microsoft SQL Server 2005 Express Edition이나 Microsoft SQL Server 2005의 인스턴스에 해당 데이터베이스 파일을 연결(attach)해야 합니다. SQLCMD나 SQL Server Management Studio를 사용하여, 다음 예제와 같은 쿼리를 실행하여 AdventureWorks 데이터베이스를 연결할 수 있습니다.

exec sp_attach_db @dbname=N'AdventureWorks', @filename1=N'C:\Program Files\Microsoft SQL Server\MSSQL.1\MSSQL\Data\AdventureWorks_Data.mdf', @filename2=N'C:\Program Files\Microsoft SQL Server\MSSQL.1\MSSQL\Data\AdventureWorks_log.ldf'


AdventureWorks 데이터베이스를 다른 디렉토리나 드라이브에 설치하기 위해서는, 각자의 환경에 따라 sp_attach_db 저장 프로시저에 입력해야 하는 매개변수를 적절하게 수정해 주어야 합니다.


3. 2006.04월 예제 코드에 추가된 내용


SqlServerSamples.msi에는 Microsoft SQL Server 2005와 Microsoft SQL Server 2005 Express Edition에 대한 예제코드가 포함되어 있습니다. Visual C#과 Visual Basic.NET 예제로 개발된 코드 중 대부분은 예제에 대한 설명에 언급된 것과 같이 Microsoft SQL Server 2005 Express Edition에서는 동작하지 않습니다.


예제를 설치하기 위해서는 SqlServerSamples.msi를 실행하면 됩니다. 설치시 다른 경로를 지정하지 않는다면, 기본값으로, [drive:]\Program Files\Microsoft SQL Server\90\Samples에 설치됩니다.


2006년 4월에 추가된 예제 코드는 다음과 같은 것이 있습니다.

Analysis Services:


Data Access (OLEDB)


Data Access (ODBC)


Common Language Runtime (CLR) Integration:


Integration Services


Replication


CLR 통합과 관련된 2005년 12 월 업데이트 내용도 포함되어 있습니다.


Server Management Objects (SMO):


Integration Services:


Replication:


Reporting Services


4.

아래는 SQL 2005 AdventureWorks  예제 데이터베이스에 대한 내용을 다루는 블로그에 기재된 내용입니다.


참고하시기 바랍니다.


원문출처...

=====================================================


http://blogs.msdn.com/bonniefe/


Welcome everyone! The purpose of this blog is to chat about the samples and sample databases for Microsoft SQL Server.  I'll be talking about some of the cool samples already shipping, and let you know about updates and new samples as time goes by.  Please participate by sending in feedback on existing samples and suggestions for new ones.

If you have Microsoft SQL Server 2005, read the topic "Installing Samples" in Microsoft SQL Server Books Online (Books Online) to learn how to install the samples which ship with that product.  You do have to go through some extra steps during installation of SQL Server to get samples installed.  In particular, on the page where you select what to install use the "Advanced" button to activate the control which allows you to select the samples for installation.

Even better, you can get the latest version of the samples on the web at http://msdn.microsoft.com/sql/downloads/samples/default.aspx.  Right the December 2005 refresh is available there.  You'll find MSIs with the samples in them, and also MSIs with various sample databases.  Be sure to pick out the correct MSI for your computer's processor (x86, x64, or IA64).

At http://www.microsoft.com/downloads/details.aspx?familyid=e719ecf7-9f46-4312-af89-6ad8702e4e6e&displaylang=en you'll find the actual MSIs, and also two important documents, GettingStartedWithSQLSamples.htm which gives you a top 10 list of things to know about the samples, and SQLServerDatabasesAndSamplesOverview.htm which provides detailed information about all the samples and sample databases.

The readme files for the samples and a lot of other sample information is located in Books Online starting at [SQL Server 2005 Books Online / Samples and Sample Databases].

The samples cover the gamut of SQL Server technologies: CLR Integration, SMO, XML, Administration, Data Access, Full Text Search, Service Broker, Analysis Services, Integration Services, Notification Services, Reporting Services, Replication.  The Integrated Samples show how to combine several of the above technologies to solve a particular business problem.

The AdventureWorks sample database provides an example of an enterprise class database schema for manufacturing, sales, inventory, purchasing, and human resource scenarios.  The AdventureWorksDW and AdventureWorksAS sample databases demonstrate how to design and use a data warehouse and an analysis services project to gather business intelligence.

Thanks for taking a look at the samples.  I hope they help you get up to speed faster on SQL Server 2005 and make your job easier and more fun.

--Bonnie

Posted by 나비:D
:

BLOG main image
by 나비:D

공지사항

카테고리

분류 전체보기 (278)
Programming? (0)
---------------------------.. (0)
나비의삽질 (5)
Application (177)
SQL (51)
Web (27)
etc. (14)
Omnia (0)
---------------------------.. (0)

최근에 올라온 글

최근에 달린 댓글

최근에 받은 트랙백

글 보관함

달력

«   2024/04   »
1 2 3 4 5 6
7 8 9 10 11 12 13
14 15 16 17 18 19 20
21 22 23 24 25 26 27
28 29 30
Total :
Today : Yesterday :